

One of the most popular Indian street foods – Pani Puri is a fried crispy puri filled with lip-smacking potato masala and loaded with flavorful water! Whether you are an adult or a child, you will never get tired of eating this. It is seriously addictive!
In this post, I'll walk you through making your own Puri for Panipuri, Teekha-meetha pani, and Masala|Stuffing.
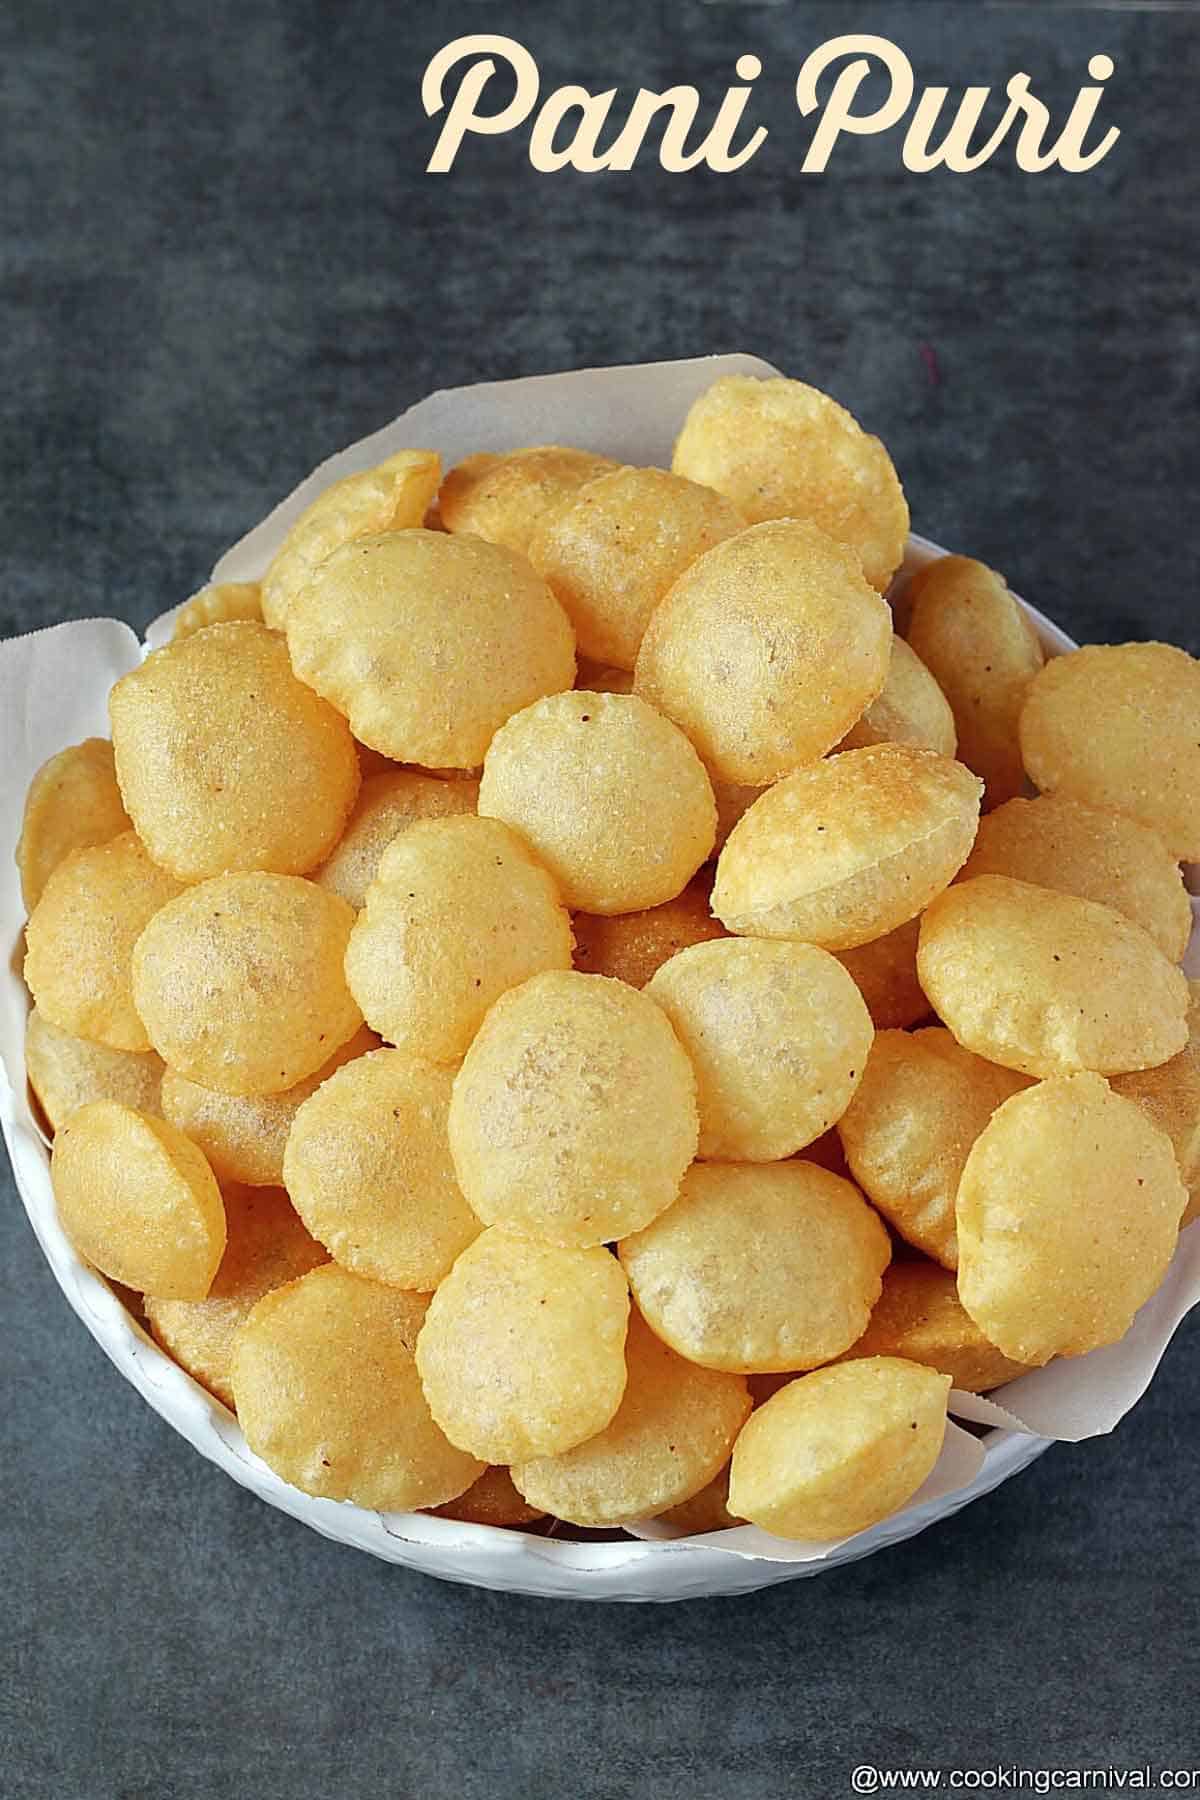
Pani puri or golgappas is my most favorite chaat from childhood. I used to have them often on the streets and it was something I have thoroughly enjoyed.
Jump to:
What is Pani Puri?
Pani puri or Golgappa is a popular street food of India.
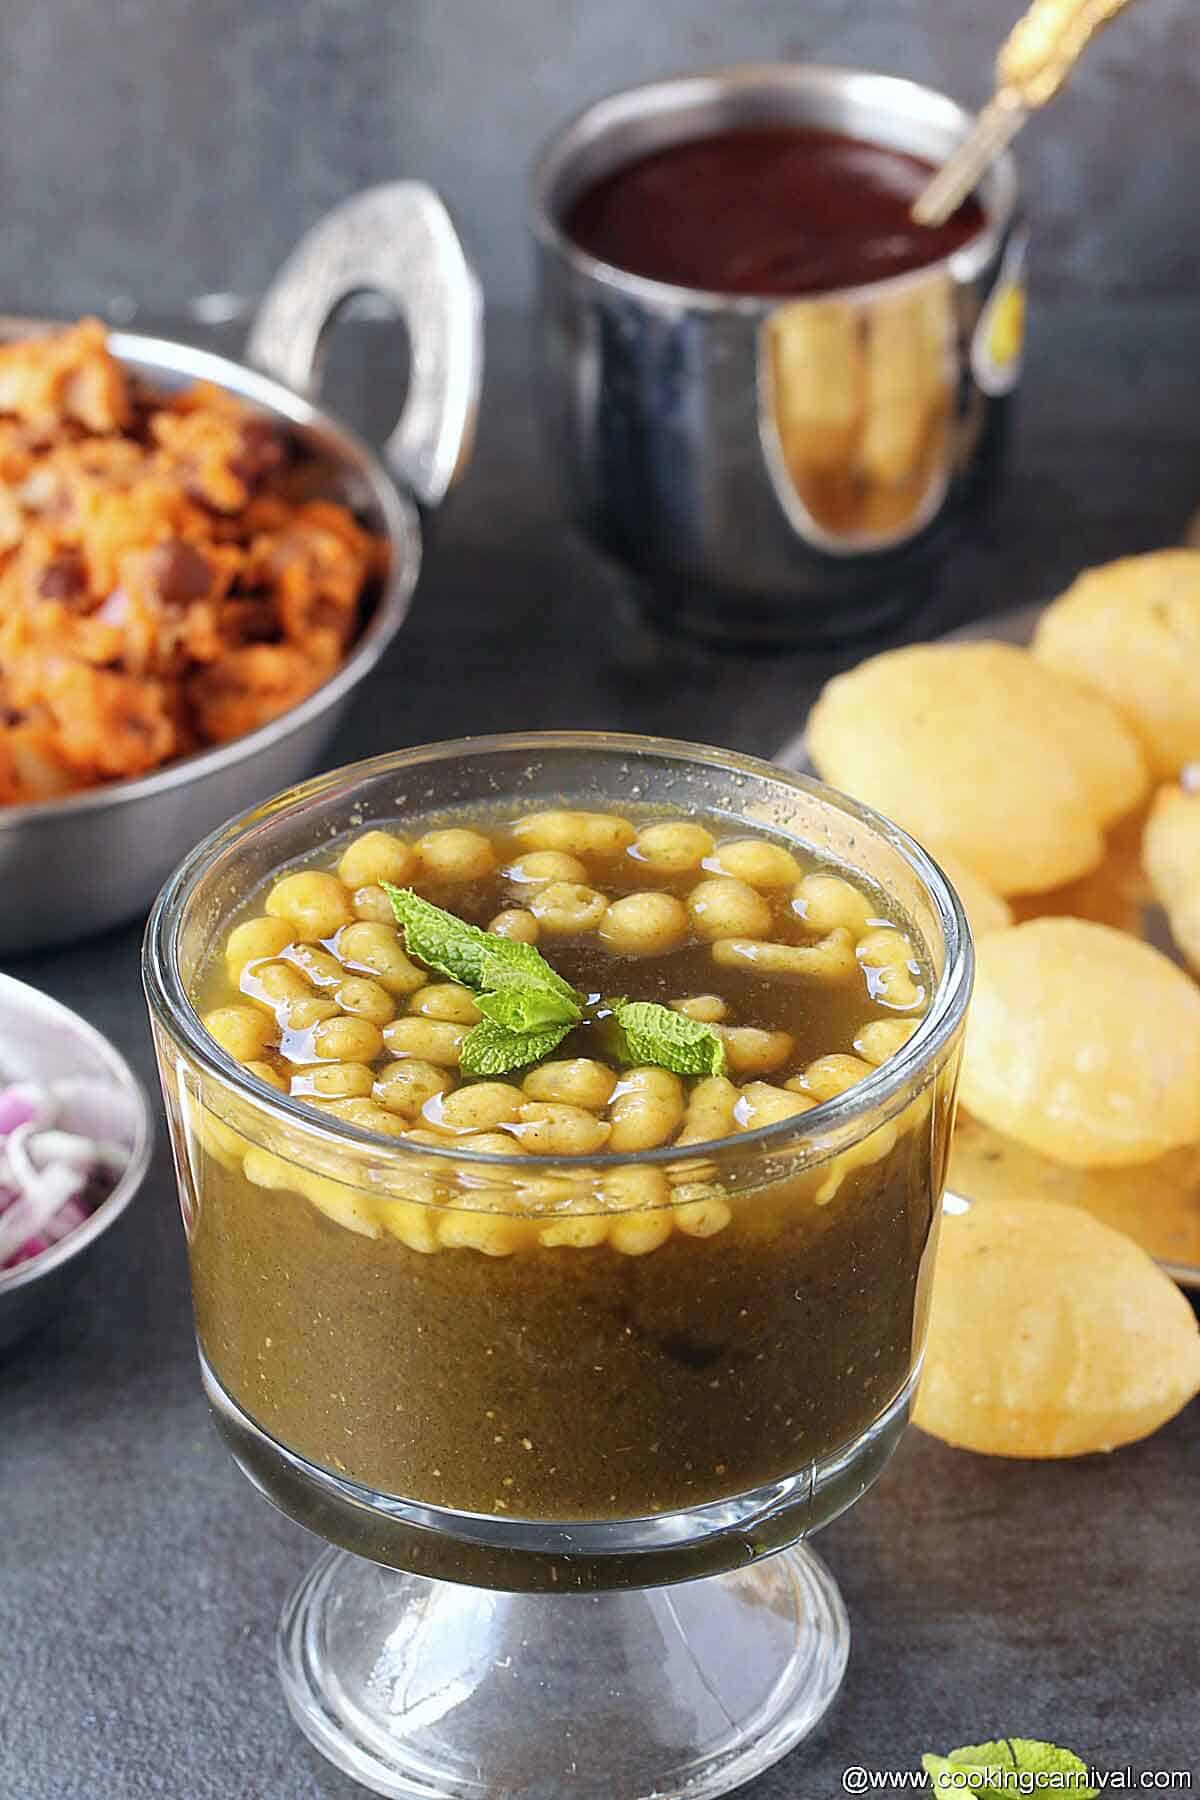
It consists of a round or ball-shaped, hollow puri (a deep-fried crisp crepe), filled with a mixture of flavored water (known as teekha pani), Sweet chutney, potato and onion.
It is a favorite chaat snack of almost everyone in India. With so many bursts of tastes and flavors in your mouth when you have pani puri, you just cannot have one!
Once you start eating, you will easily lose track of how many you ate.
Different Pani Puri names in different parts of India –
- In Haryana, it is known as paani patashi,
- Madhya Pradesh fulki
- in Uttar Pradesh pani ke batashe,
- in Assam phuska/puska
- pakodi in parts of Gujarat,
- Gup-chup in parts of Odisha,
- Phuchka in Bihar, Nepal, Jharkhand, Bengal and Chhattisgarh.
Also making of pani puri differs from region to region.
How to make Pani Puri?
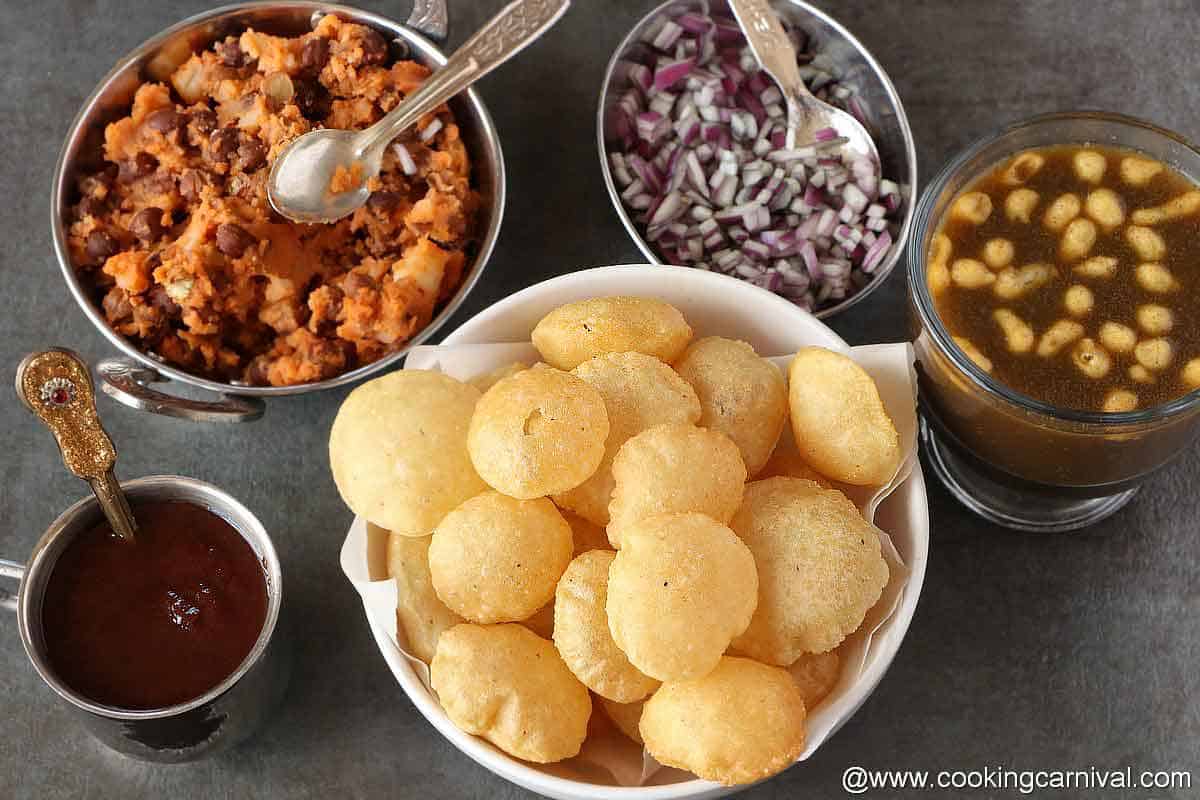
There are 4 parts –
- Puri
- Masala/stuffing/filling
- Pani (Tikha-mitha)
- Add on – Chopped onions and meetha pani Optional)
1. Puri –
In India, we used to get ready-made fresh puri from the market.
But here in the US, where I live, we don’t get FRESH puries in the store. The puries are either too old or broken.
Sure, ready to fry puries are also available and it does make life a lot simpler. But those dont taste like Puri at all. Those tastes like fryums.
That’s why I prefer to make poori at home from scratch. Plus you know what goes into it and the quality of oil you used to fry them.
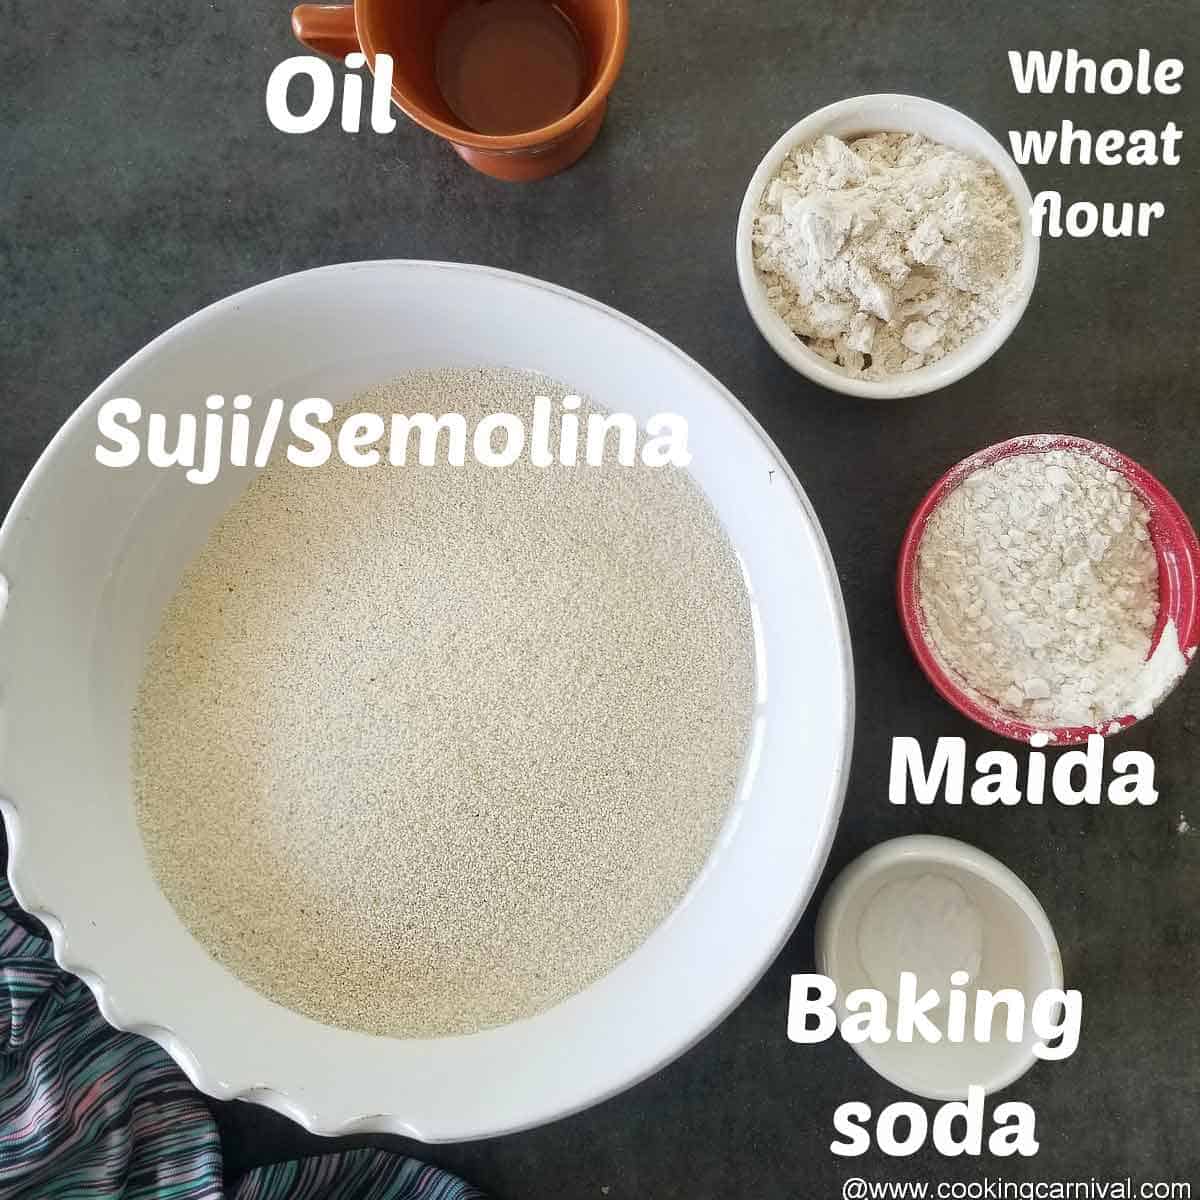
Ingredients required –
Note – (measurement is given in the recipe card, please scroll the page)
You will need –
- Semolina
- Maida (All purpose flour)
- Aata (Whole wheat flour)
- Oil
- Club soda or baking soda+water.
I do make puris 2 different ways –
With club soda – Whenever I have club soda in my pantry, I always prefer to make puri with it. Making with club soda is the easiest method. The puries come out perfect every time.
With baking soda – I use this method when I don’t have club soda at home. The puri needs to be crispy and puffed up. To achieve that you need to roll the puri as evenly as possible. If you are a beginner, and not able to roll well, adding some baking soda helps in puffing the puries.
Frankly speaking, both the method is good and puri comes out perfectly.
The basic science is, the moisture present in the dough when comes to contact with hot oil, the puri swells.
How to make it from scratch? Step by step process
I didn’t have club soda on hand so I made it with baking soda.
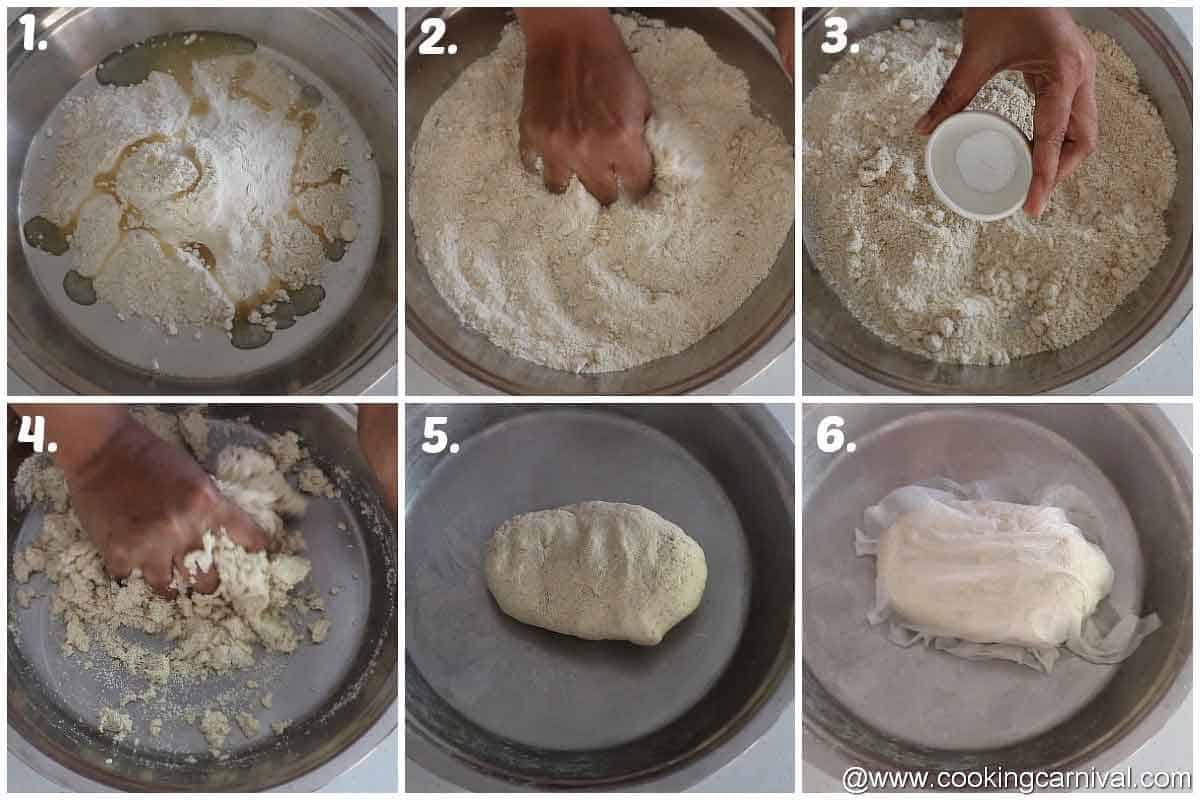
First take suji, all-purpose flour, and maida in a big mixing bowl. Add oil mix well. (Photo 1 and 2))
Now add baking soda. Mix all ingredients thoroughly. (Photo 3)
Add water 1 to 2 tablespoon at a time and start kneading the dough. Keep adding the water until you get an elastic dough that is neither too soft nor too stiff. Knead the dough for 5 minutes. Add more water if needed. The dough should such that it should roll easily without any cracks. While kneading the dough, keep in mind that Rawa absorbs water. (photo 4 and 5))
Cover the dough with a damp cloth or paper towel Set aside for 30 minutes. (Photo 6)
After the resting time, knead the dough again for 2 to 3 more minutes.
There are 3 ways you can roll the puries –
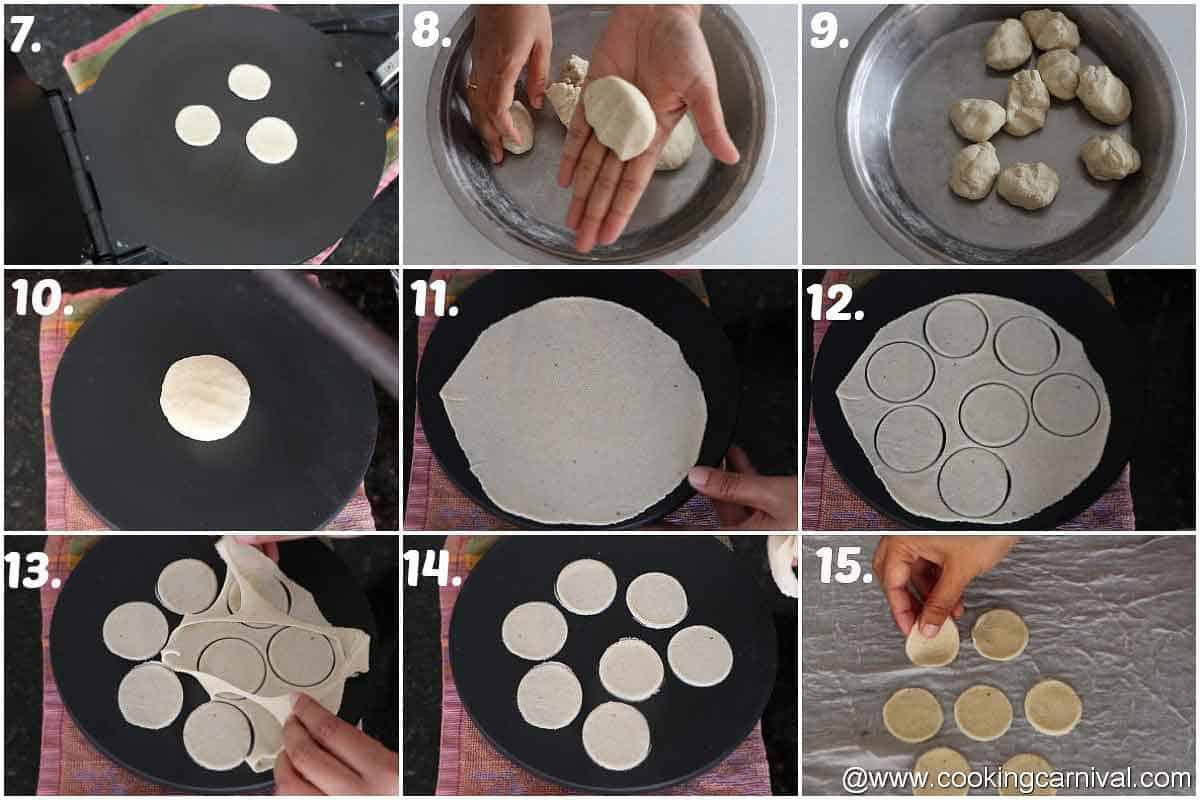
- In tortilla maker – (Photo 7)
Divide the dough 90 to 100 equal small parts. Shape them into roundels. Cover this balls with a moist cloth. Place 4 to 5 balls in tortilla maker and press them.
- On rolling board –
Take one ball on your rolling board and roll it into thin and even round. If the ball is not rolled evenly, then the poories won't puff up.
- Divide the dough into 9 equal parts.
Take one part on a rolling board and cover the remaining dough ball with a damp cloth. (Photo 8 to 10)
Roll it evenly to a diameter of 8 to 9 inches approx. It shouldn’t be too thick or thin. (Photo 11)
Using a round cutter, cut out the circles. (Photo 12)
Transfer them onto a damp cloth and cover all the puries with another damp cloth. Repeat the same with the other 8 parts. Collect the scraps, knead again and roll it out. Repeat the same process until all the dough is over. (Photo 13 to 15)
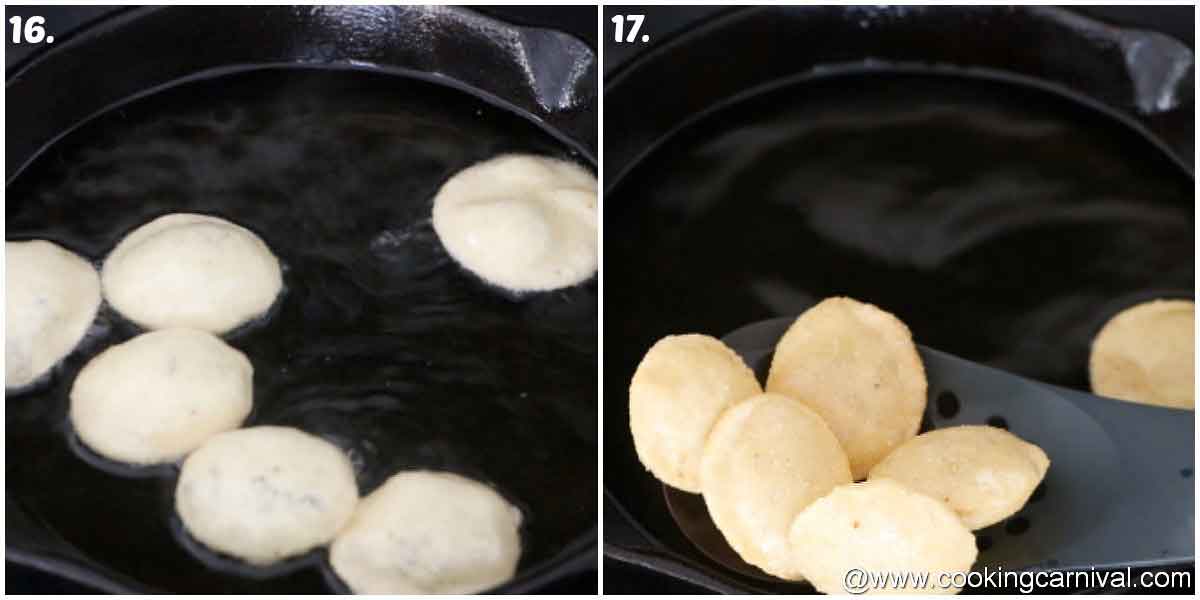
Heat oil well. Add one puri to check the thickness and temperature of the puri. The puri should sizzle, float and puff up immediately. (Photo 16)
Gently add 3 to 4 puries in the oil. Nudge the puries with a spoon to help them puff up. Fry all the puries on a medium flame.
Keep flipping them on both sides until it reaches a light golden brown color and puris are crisp. (Photo 17)
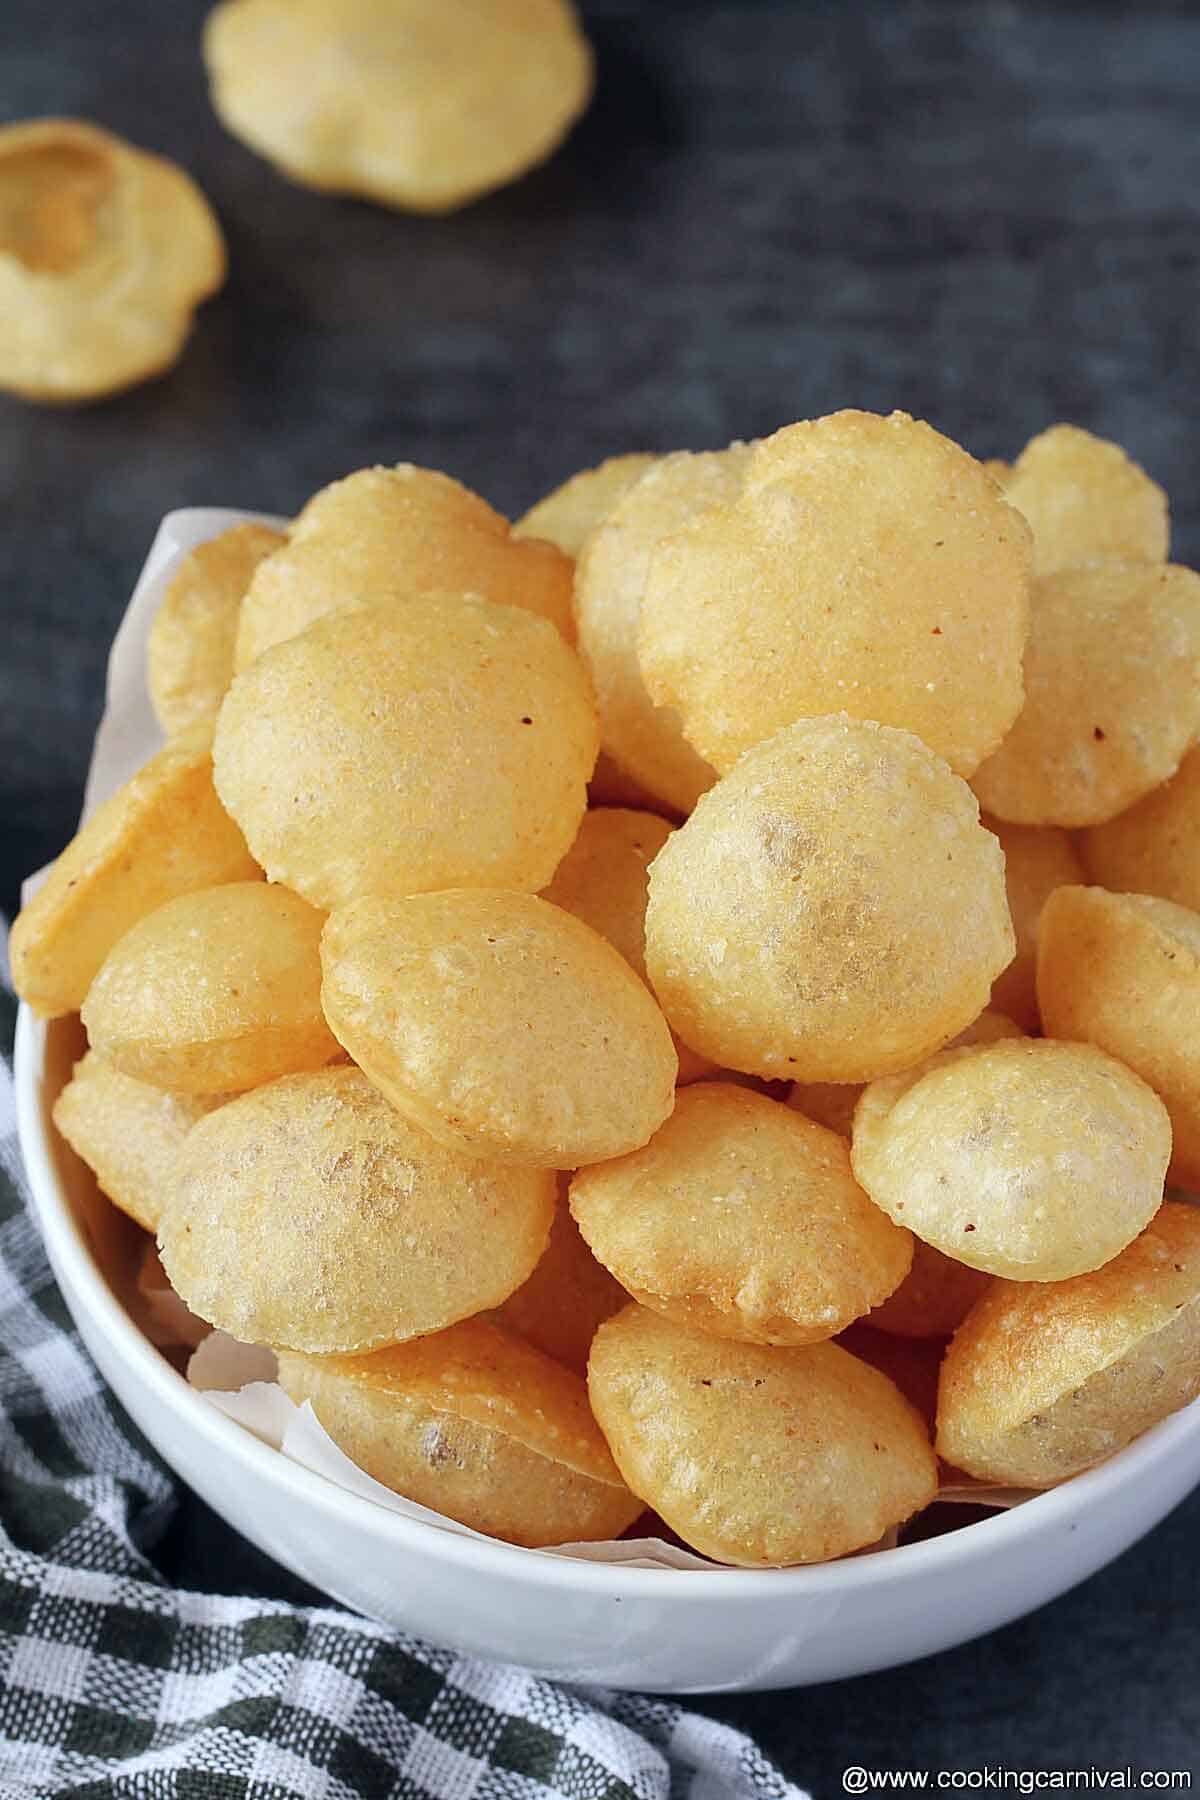
Take them out on absorbent paper.
Fry the remaining puris, in the same way.
Pro-tips –
You need to look into the below tips while making the puries at home –
- You can skip the all purpose flour and use only aata/whole what flour and rawa (Sooji).
- The dough consistency – The dough should be soft just like chapati dough.
- Kneading the dough – Kneading the dough is the most important step. It helps in making puri crispy.
- Always cover the dough with a damp cloth. Don’t let the dough dry.
- Resting the dough for 30 minutes is important to help to form the gluten.
- The thickness of the puri – Roll the dough as evenly as possible. The puri has to be thin, Neither paper-thin nor thick.
- Once the puries are rolled cover them with a damp cloth.
- The temperature of the oil – The oil should be hot. The puries should begin to float and puff immediately. Fry the puries on a medium temperature.
- Do not stack fried puri – Spread the puries on a tray. Don’t stack them one over the other while they are hot. They can get soggy.
- If you feel like poori is slightly soft, place them onto cookie pan. Preheat the oven @200 degree F. and Switch off the oven. Put puri into the preheated oven for 10 to15 minutes. This will make poori crispy.
- The ones that don’t puff up can be used for the chaat recipes like sev puri, bhel puri, etc,
- Store the puries in an air-tight container. Stays good for 15 days.
- This puri can be used to make Dahi Puri too.
2. Pani puri filling | Stuffing
Note – (measurement is given in the recipe card, please scroll the page)
There are a lot of varieties when it comes to the filling. My family loves stuffing with red chana and potatoes.
Ingredients required
- Kala chana
- Potatoes
- Salt
- Chili powder
How to make Pani puri masala/filling?
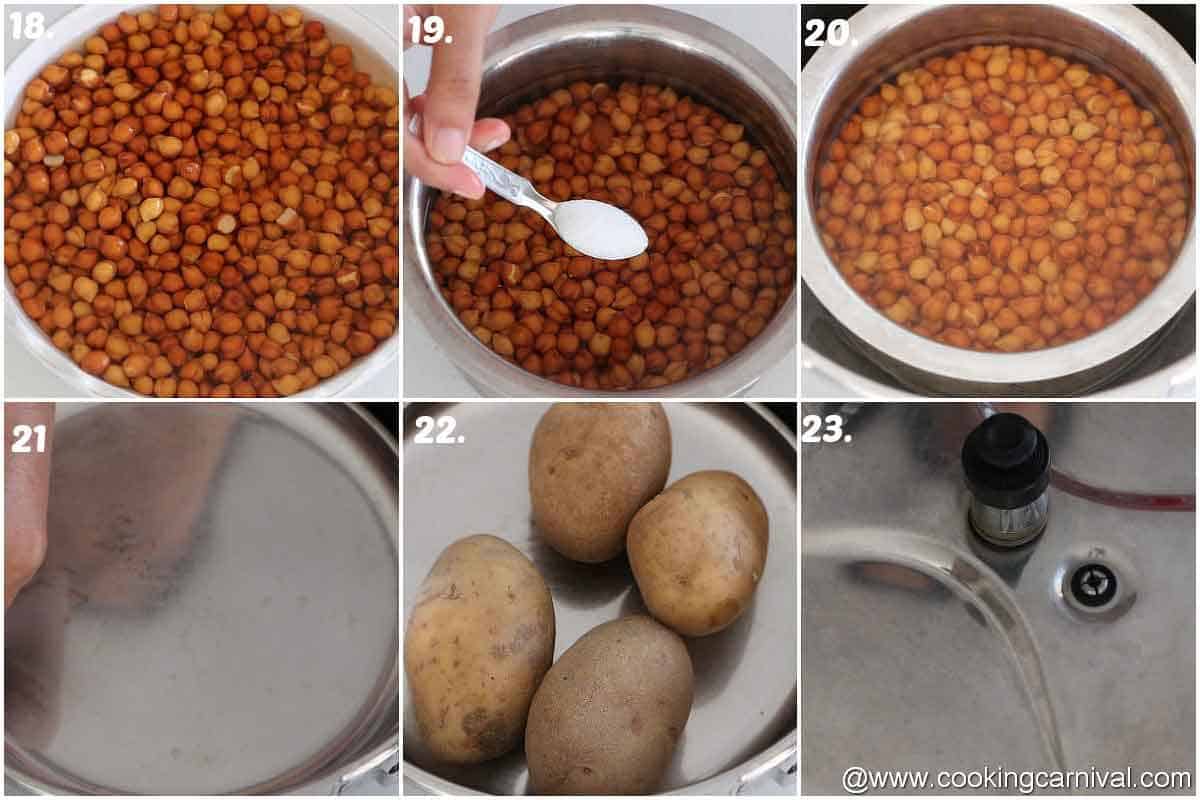
Soak chana overnight in water. (Photo 16)
Next day, drain all the water. Take soaked chana in a bowl, add water and salt. (Photo 19 and 20)
Place the chana bowl in a pressure cooker and cover it. (Photo 21)
Cut potatoes into half and place potatoes on top of the chana. (Photo 22)
Cover the pressure cooker lid and take 7 whistles. (Photo 23)
Once cooking is done and pressure cool down, open the lid.
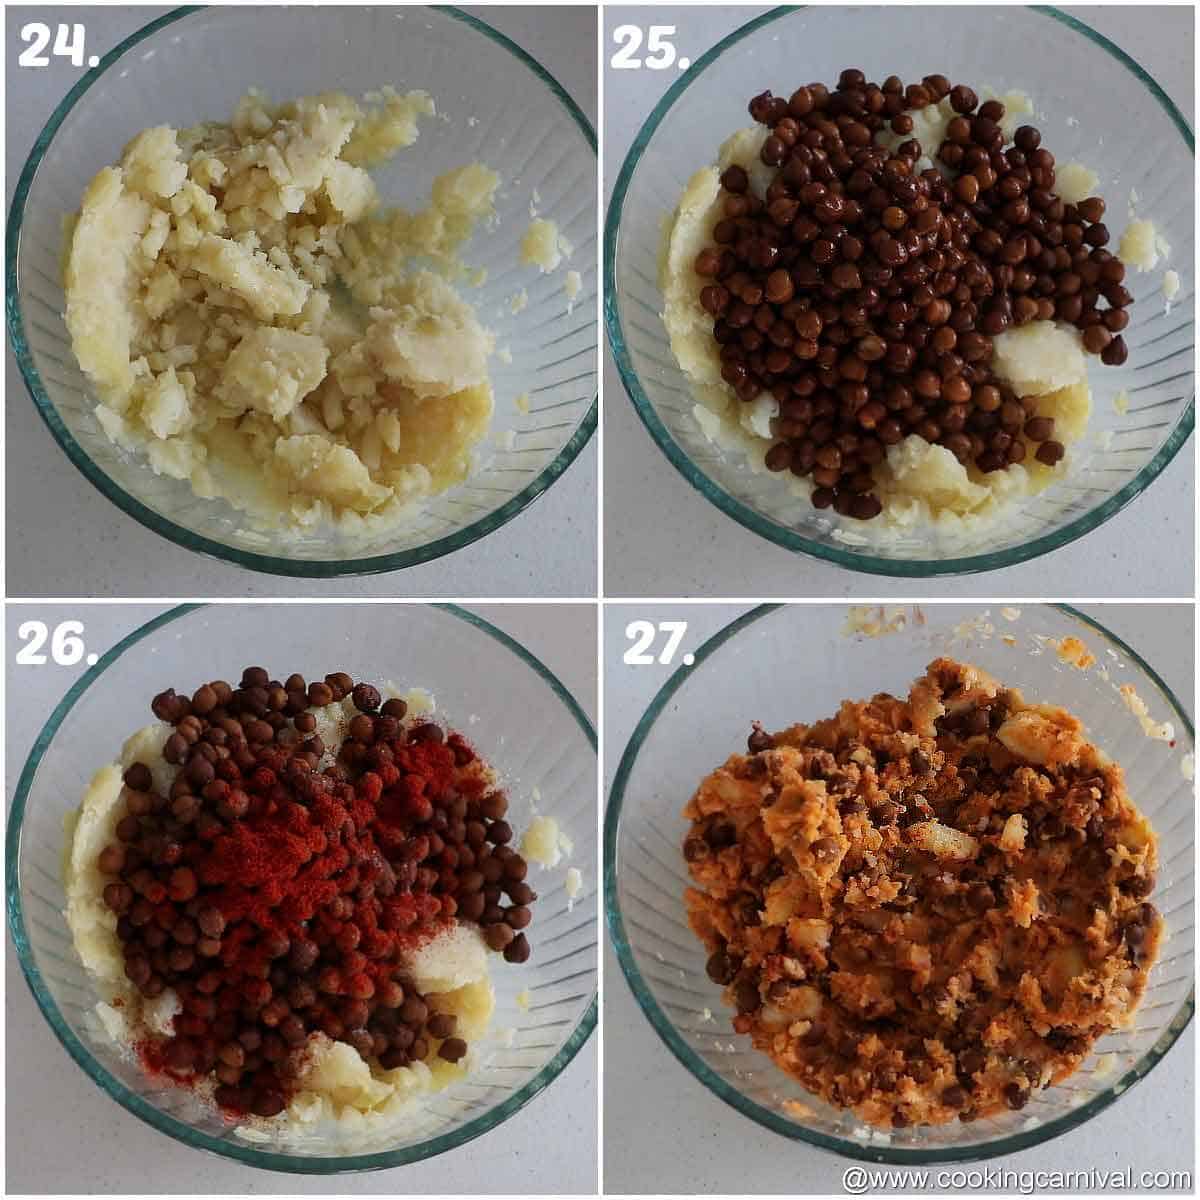
Peel the potatoes and mash them. (Photo 24)
Drain all the water from boiled chana and mix chana with mashed potatoes. (Photo 25)
Now add salt and chili powder. Add less salt as we have already added salt in the chana while boiling. (Photo 26)
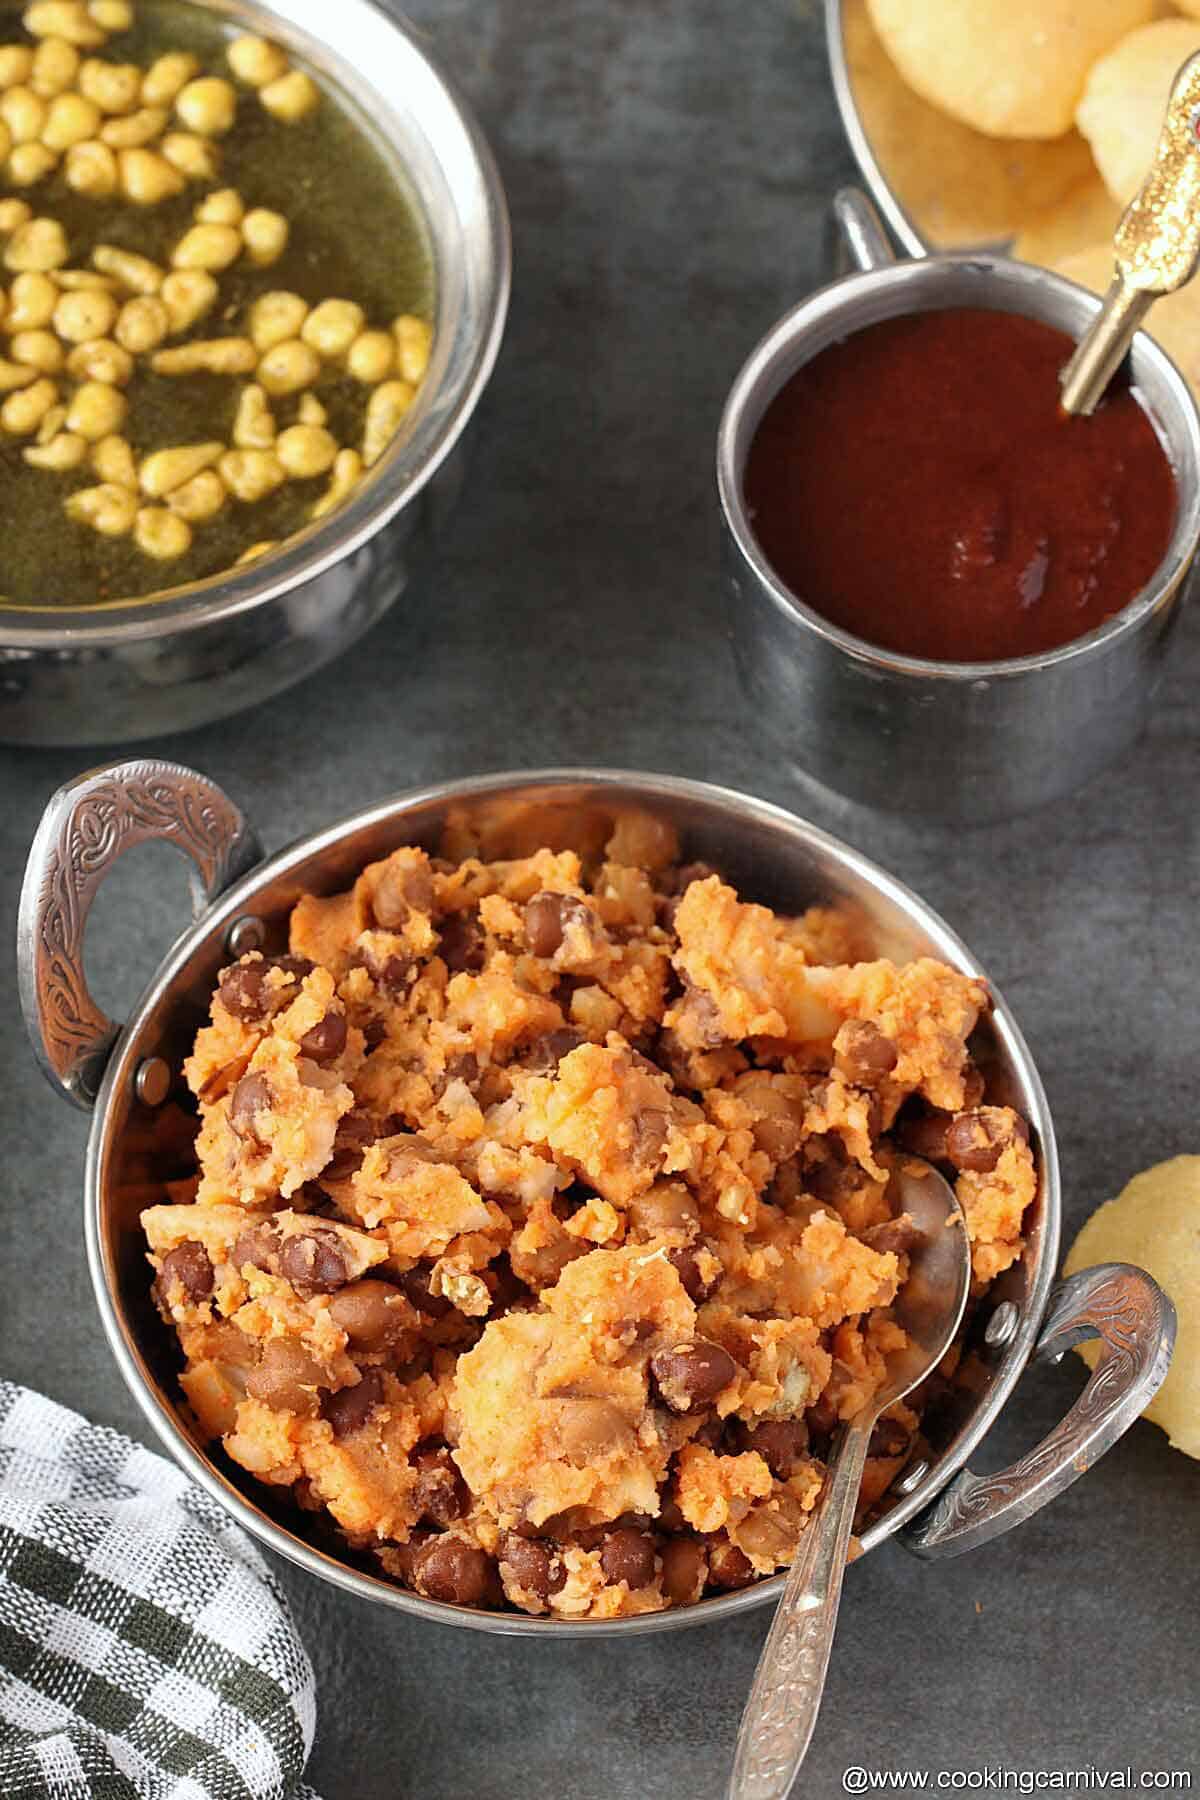
Mix everything. Pani puri filling is ready. Keep it aside. (Photo 27)
Other options for stuffing –
- Ragda – If you are a hot pani puri lover, then try with ragda. For that, you will need to soak dried peas overnight, pressure cooks them the next day, spice them with chili powder, salt, and turmeric powder.
- Sprouted moong
- With only boondi
3. Teekha and meetha Pani
This spiced water | Pani puri ka pani recipe is my family’s favorite. I make this in such a way that it would have all the three major tastes - spicy, tangy and sweet. So all three tastes - teekha, khatta, and meetha taste in just one pani. Otherwise generally both the spicy chutney and sweet chutney are made separately.
Let me tell you, this is the best and only pani recipe you will need. It’s a bomb of flavors!
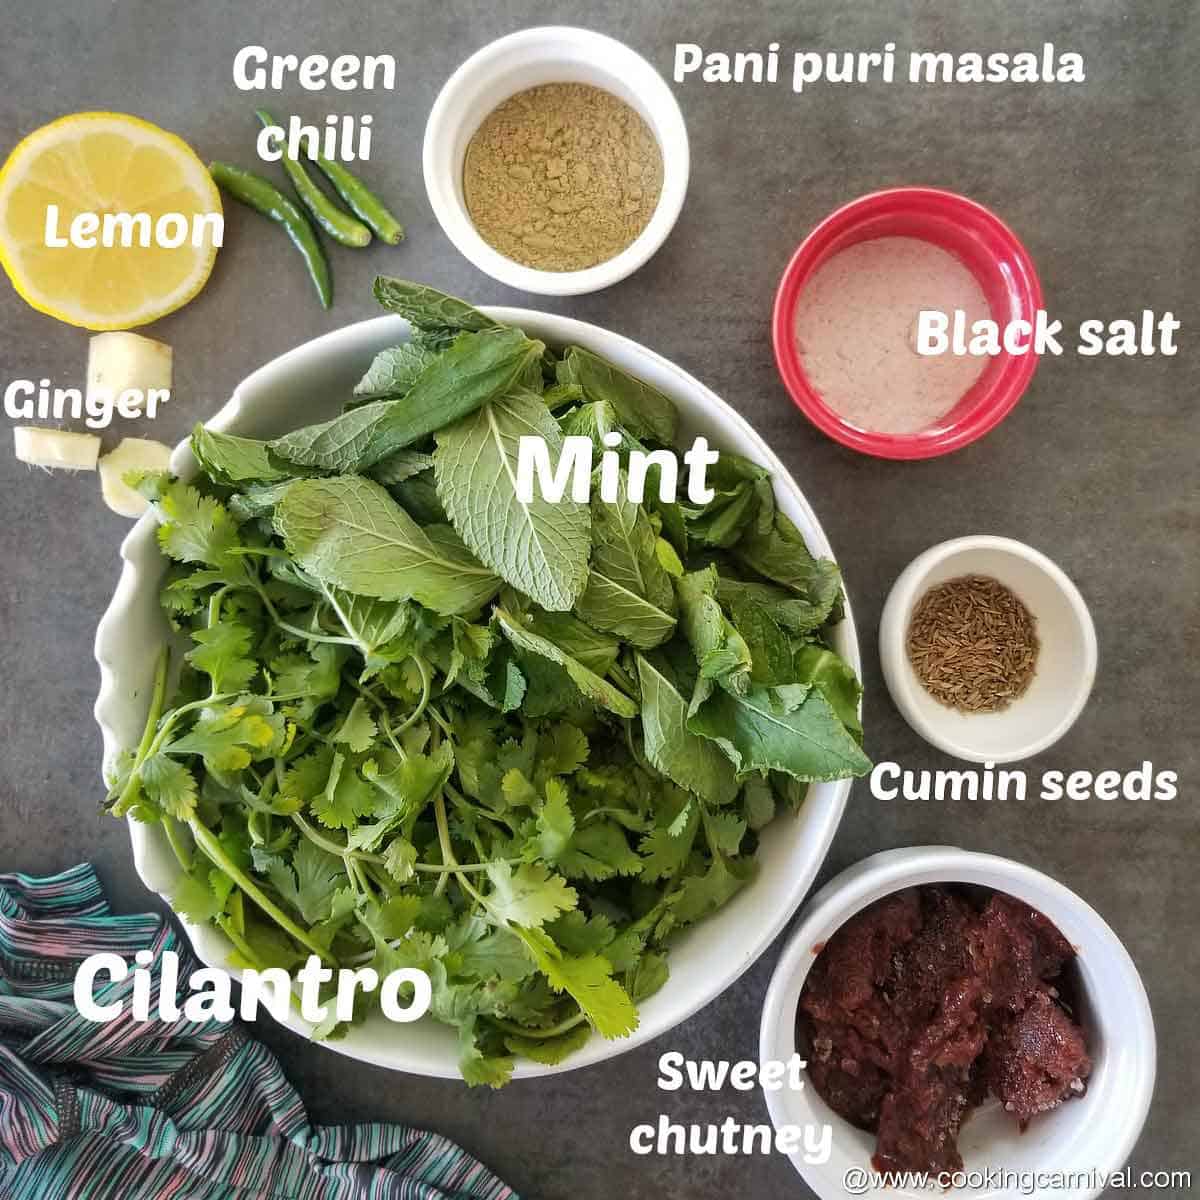
Ingredients required –
Note – (measurement is given in the recipe card, please scroll the page)
- Mint
- Cilantro
- Green chilies
- Ginger
- Lemon juice
- Pani puri masala
- Black salt
- Cumin seeds
- Khajoor – imli ki chutney (Date and tamarind chutney)
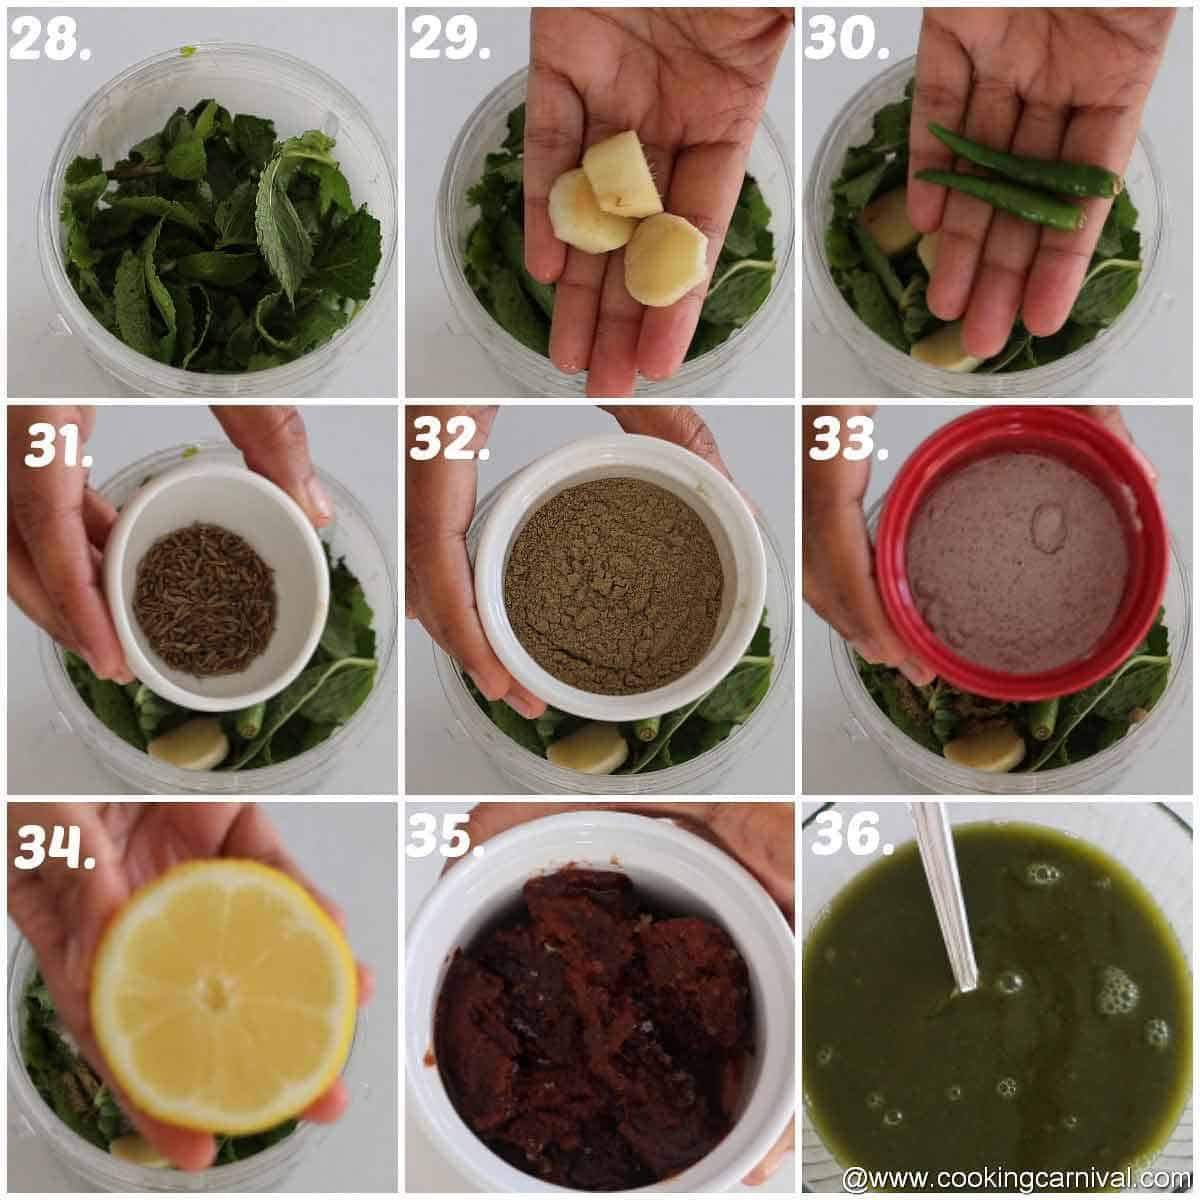
How to make Pani puri water? (Photo 28 to 36)
In a Blender, take all the ingredients of pani and grind them very well.
Add 2 liter of water or add more water if you want more thin pani. But keep on checking the seasoning as per your taste.
Place the pani in the refrigerator for a minimum of one hour to chill.
Pani puri ka pani is already. Add boondi to the pani if you wish to while serving.
Notes and pro-tips
- Make Pani Puri pani before 5 to 6 hours for the better taste.
- If you want only teekha pani, don't add sweet chutney while making pani. But believe me adding sweet chutney while preparing pani gives an awesome taste. At least try once making pani in this way. I am sure you will like it. Adjust the sweetness according to your taste.
- You can freeze the left over paani in an airtight container in the freezer. It stays good up to 3 to 4 months.
- If you don’t have black salt, use regular salt.
- Why my pani color is not green? That’s because I have added sweet chutney and it turned into brownish-green color.
Now, How do you eat Pani Puri?
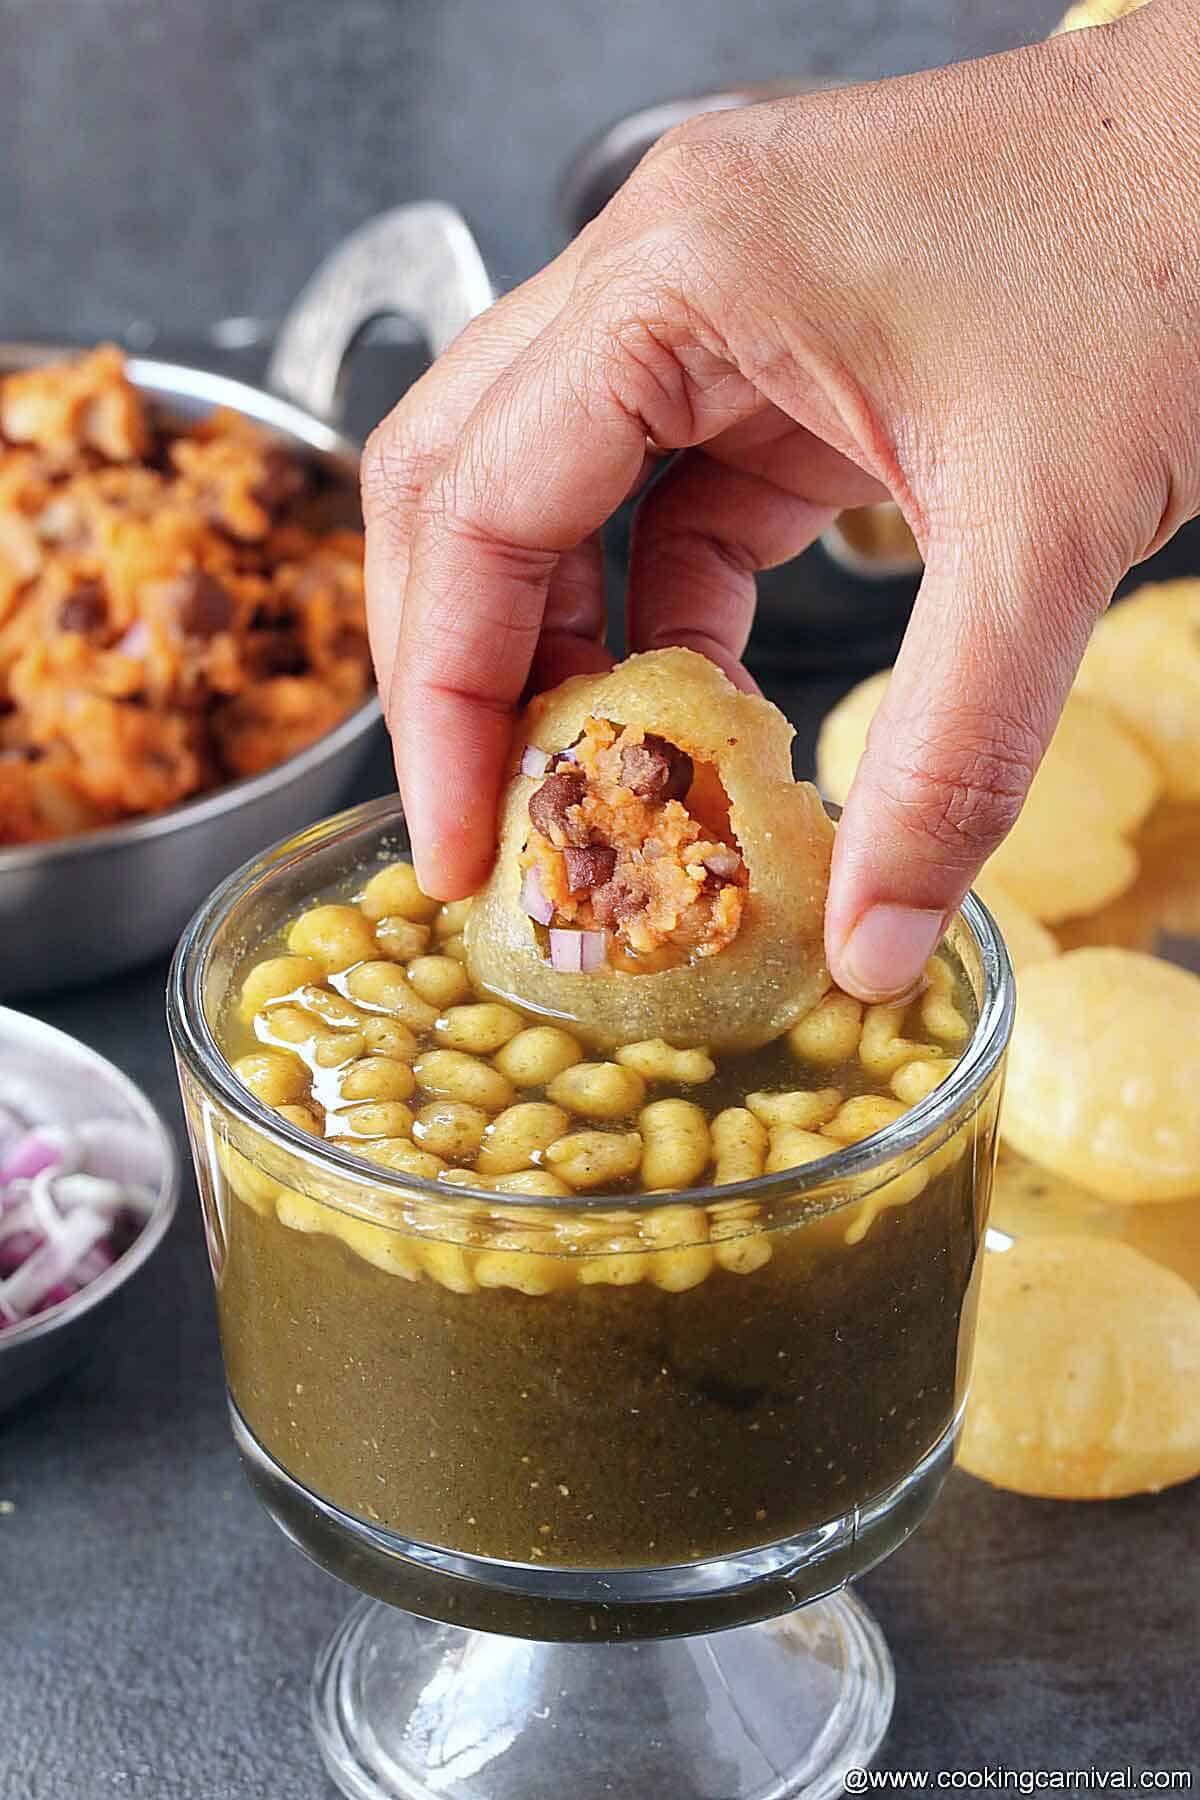
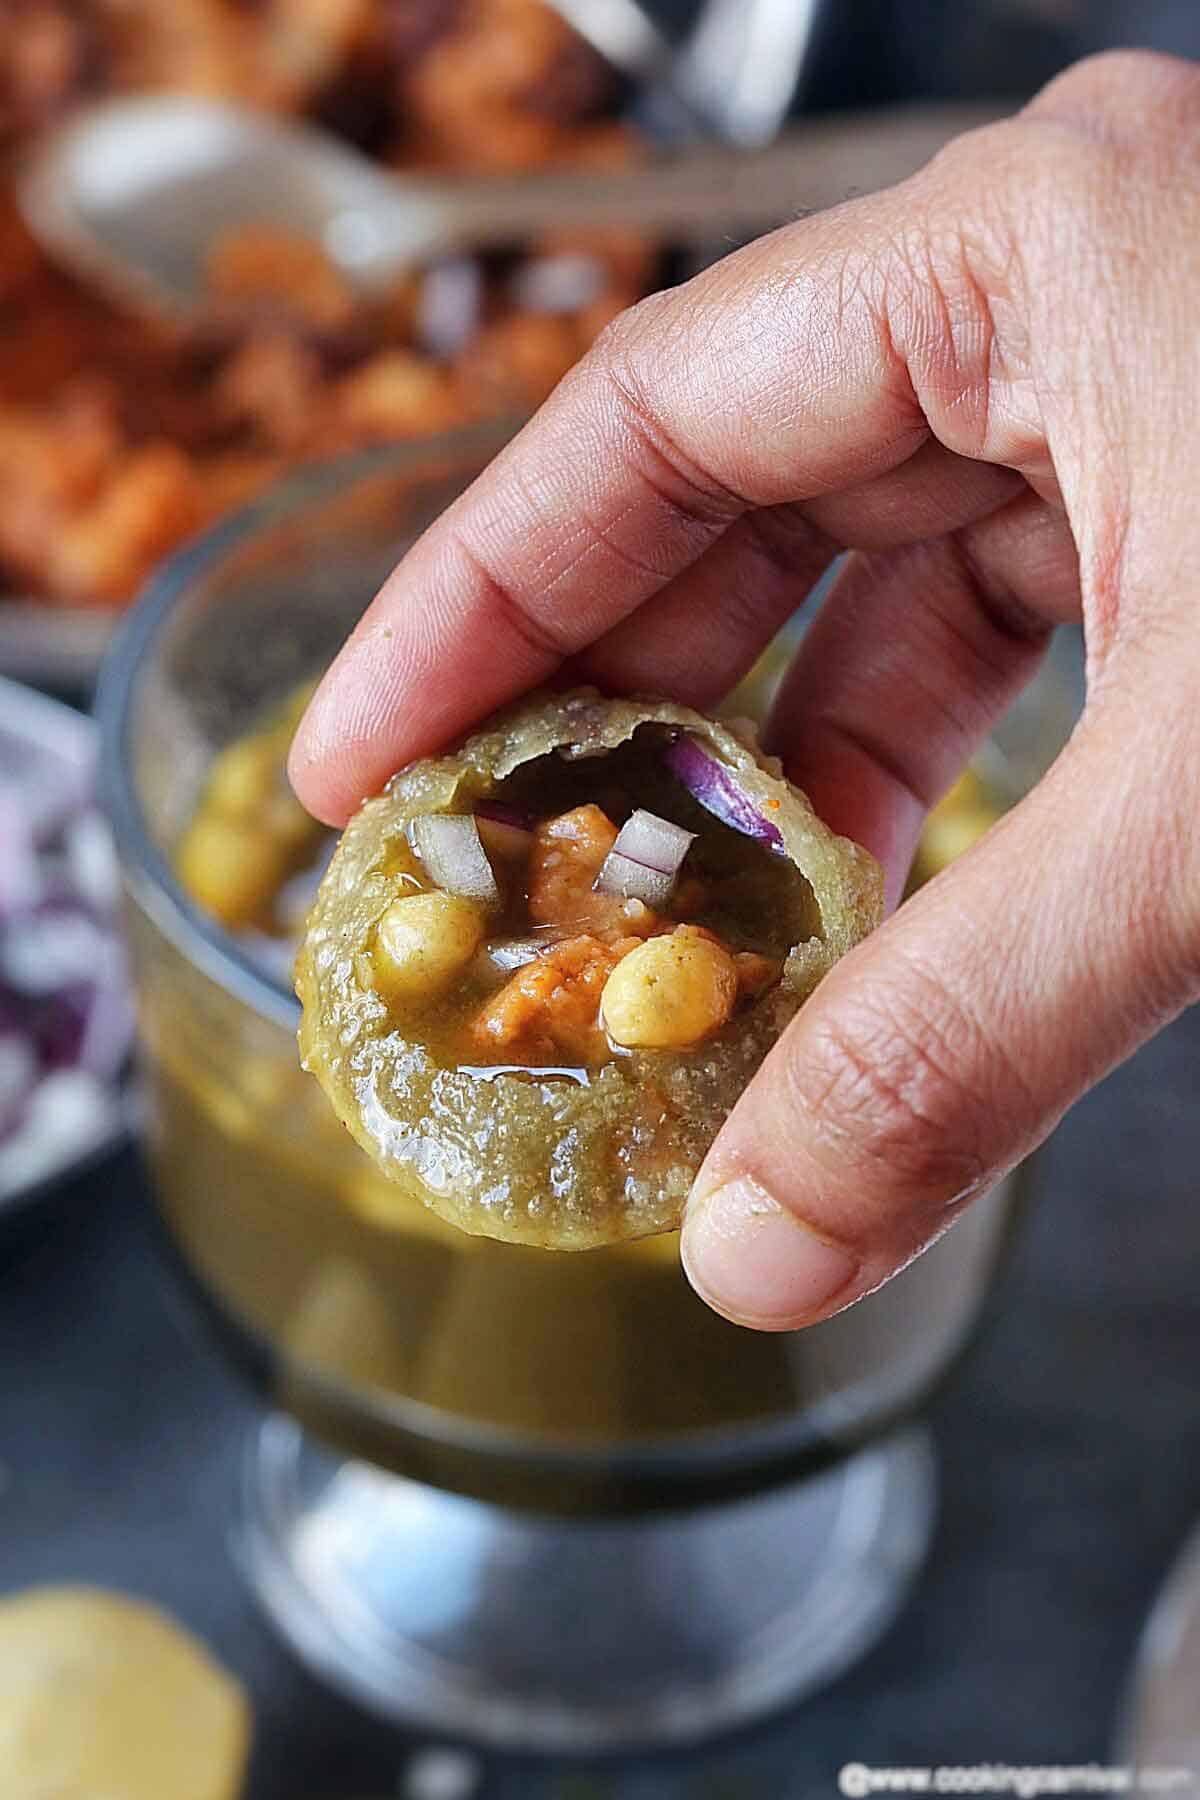
- Take the puri in your hand and poke a hole in it using your thumb or a spoon.
- Take some filling in a spoon and put it inside the puri through the hole. Add some chopped onions.
- Dip the stuffed puri in a bowl of pani or pour some pani inside it using a spoon or a ladle.
- Eat it immediately. Take it all in one bite. Don’t let it get soggy, or the ball will break down. Repeat the same with more pooris.
- And don’t forget to eat sukha puri at the end. To make a sukha, stuff the puri with the masala. Now, instead of adding any pani, add chaat masala to it and sprinkle sev. Eat it immediately.
Is Pani Puri vegan?
Yes! It is vegan.
One more note –
Make sure, you assemble pani puri only when you are ready to eat or else it will get soggy and the crispiness of the puri will be lost.
Some more Indian street food recipes –
★ Have you tried this recipe? We'll love your feedback, Please click on the stars in the recipe card below to rate and leave your feedback in the comment box below.
Subscribe to our YouTube Channel for tasty and easy video recipes.
Pani Puri (Recipe for homemade puri, pani and stuffing)
Ingredients
- 1 cup Sooji Flour / fine Semolina / Rava
- ⅓ cup All-purpose flour/maida
- ⅓ cup Whole wheat flour
- 1.5 tablespoon Oil
- ¼ teaspoon baking soda
- ¾ cup water
- 2 cups Mint leaves
- 2 cups Coriender / Cilantro leaves
- 2 Green chilies
- 1 inch Ginger
- 2 teaspoon Black salt Very important ingredient
- 2 tablespoon Pani Puri masala
- 1 teaspoon Cumin seeds
- 1 tablespoon Lemon juice
- 2 cups Sweet Chutney
- 2 liter water or as needed
- 1 cup Dried Kala Chana
- 500 grams Boiled and mashed potatoes
- Salt as per your taste.
- 2 teaspoon red chili powder
- Sweet chutney
- Chopped Onion
- Oil for frying
Method
- I didn’t have club soda on hand so I made it with baking soda.
- First take suji, all-purpose flour and maida in a big mixing bowl.
- Add oil mix well.
- Now add baking soda. Mix all ingredients thoroughly.
- Add water 1 to 2 tablespoon at a time and start kneading the dough. Keep adding the water until you get an elastic dough that is neither too soft nor too stiff. Knead the dough for 5 minutes. Add more water if needed. The dough should such that it should roll easily without any cracks. While kneading the dough, keep in mind that Rawa absorbs water.
- Cover the dough with a damp cloth or paper towel Set aside for 30 minutes.
- After the resting time, knead the dough again for 2 to 3 more minutes.
- There are 3 ways you can roll the puries –
- Divide the dough 90 to 100 equal small parts. Shape them into roundels. Cover this balls with a moist cloth. Place 4 to 5 balls in tortilla maker and press them.
- Take one ball on your rolling board and roll it into thin and even round. If the ball is not rolled evenly, then the poories won't puff up.
- Take one part on a rolling board and cover the remaining dough ball with a damp cloth.
- Roll it evenly to a diameter of 8 to 9 inches approx. It shouldn’t be too thick or thin.
- Using a round cutter, cut out the circles.
- Transfer them on to a damp cloth and cover all the puries with another damp cloth. Repeat the same with the other 8 parts. Collect the scraps, knead again and roll it out. Repeat the same process until all the dough is over.
- Heat oil well. Add one puri to check the thickness and temperature of the puri. The puri should sizzle, float and puff up immediately.
- Gently add 3 to 4 puries in the oil. Nudge the puries with a spoon to help them puff up. Fry all the puries on a medium flame.
- Keep flipping them on both sides until it reaches a light golden brown color and puris are crisp.
- Take them out on an absorbent paper.
- Fry the remaining puris, in the same way.
- Soak chana overnight in water.
- Next day, drain all the water. Take soaked chana in a bowl, add water and salt.
- Place the chana bowl in a pressure cooker and cover it.
- Cut potatoes into half and place potatoes on top of the chana.
- Cover the pressure cooker lid and take 7 whistles.
- Once cooking is done and pressure cool down, open the lid.
- Peel the potatoes and mash them.
- Drain all the water from boiled chana and mi chana with mashed potatoes.
- Now add salt and chili powder. Add less salt as we have already added salt in the chana while boiling.
- Mix everything. Pani puri filling is ready. Keep it aside.
- In a Blender, take all the ingredients of pani and grind them very well.
- Add 2 liter of water or add more water if you want more thin pani. But keep on checking the seasoning as per your taste.
- Place the pani in the refrigerator for a minimum of one hour to chill.
- Pani puri ka pani is ready. Add boondi to the pani if you wish to while serving.
Nutrition
Notes
How do you eat Pani Puri?
- Take the puri in your hand and poke a hole in it using your thumb or a spoon.
- Take some filling in a spoon and put it inside the puri through the hole. Add chopped onion.
- Dip the stuffed puri in a bowl of pani or pour some pani inside it using a spoon or a ladle. Add sweet chutney too if you like.
- Eat it immediately. Take it all in one bite. Don’t let it get soggy, or the ball will break down. Repeat the same with more pooris.
- And don’t forget to eat sukha puri at the end. To make a sukha, stuff the puri with the masala. Now, instead of adding any pani, add chaat masala to it and sprinkle sev. Eat it immediately.
Pro-tips for Puri
You need to look into below tips while making the puries at home –- You can skip the all purpose flour and use only aata/whole what flour and rawa (Sooji).
- If you have club soda on hand, please use that instead of water and baking soda.
- The dough consistency – The dough should be soft just like chapati dough.
- Kneading the dough – Kneading the dough is the most important step. It helps in making puri crispy.
- Always cover the dough with a damp cloth. Don’t let the dough dry.
- Resting the dough for 30 minutes is important to help to form the gluten.
- The thickness of the puri – Roll the dough as evenly as possible. The puri has to be thin, Neither paper-thin nor thick.
- If you have tortilla maker/press, use that to make the puri. It makes life easy and saves lot of time.
- Once the puries are rolled cover them with a damp cloth.
- The temperature of the oil – The oil should be hot. The puries should begin to float and puff immediately. Fry the puries on a medium temperature.
- Do not stack fried puri – Spread the puries on a tray. Don’t stack them one over the other while they are hot. They can get soggy.
- If you feel like poori is slightly soft, place them onto cookie pan. Preheat the oven @200 degree F. and Switch off the oven. Put puri into the preheated oven for 10 to15 minutes. This will make poori crispy.
- The ones that don’t puff up can be used for the chaat recipes like sev puri, bhel puri, etc,
- Store the puries in an air-tight container. Stays good for 15 days.
- This puri can be used to make Dahi Puri too.
Other options for stuffing –
- Ragda – If you are a hot pani puri lover, then try with ragda. For that, you will need to soak dried peas overnight, pressure cooks them the next day, spice them with chili powder, salt, and turmeric powder.
- Sprouted moong
- With only boondi
Notes and pro-tips for Pani (Spiced mint water)
- Make Pani Puri pani before 5 to 6 hours for the better taste.
- If you want only teekha pani, don't add sweet chutney while making pani. But believe me adding sweet chutney while preparing pani gives an awesome taste. At least try once making pani in this way. I am sure you will like it. Adjust the sweetness according to your taste.
- You can freeze the left over paani in an airtight container in the freezer. It stays good up to 3 to 4 months.
- If you don’t have black salt, use regular salt.
- Why my pani color is not green? That’s because I have added sweet chutney and it turned into brownish-green color.
Private Notes
Tried this recipe?
Let us know We would love to hear your thoughts! Please leave your comments, ratings, and any ideas or changes you think could help us make our recipes even better. Thank you for your feedback!Warm regards,
Dhwani.


Can we use regular soda.
Hi Falguni!!!
If you are asking baking about baking soda, than yeas you can use it to make puri. Add 1/2 tsp in warm water and knead dough using that water. But I would recommend you to use club soda / regular soda (drink) to make puri.It will give best result.
Thanks.
Excellent recipe ! Will try it…but can I pan fry the puris instead of deep frying? I am more into healthy cooking but love pani puri. Thanks a lot for sharing!
Thanks Sonali S!!!
No dear, You have deep fry the puri….
Any alternative for pani puri masala? or how can I prepare at home?
Hi Shailly!!!
You can roasted 1 tsp cumin powder and 2 tbsp chaat masala instead of pani puri masala.
Thanks.
Hi . the recipe is fantastic. but i just wanted to ask u about the texture of sujii. it should be course or fine.
Hi Varsha!!!
Thank you. The sooji should be medium (Not too coarse).
Hi dear y i cant copy frm here.or wat to do if wana save pics?
Thank you for visiting CookingCarnival.com Urmi. Due to certain reasons, content of this website are copy disabled. However, there are various options for sharing the recipe with friends and families on social media platform, e.g. Facebook, Twitter, Pinterest and WhtsApp.
Thanks so much for your exact amount of dough and cub soda measurement.
I made the poori yesterday and come our perfect.
Thanks 🙂
Hi Sweety!!!
Glad it came out perfect for you. Thanks for the feedback dear. 🙂
Ofcourse 🙂 I had one question though, do you fry the bottom part of the poori more than the top? or fry both side equally?
Sweety, Fry both side equally. Bottom Part will take more to cook.
OK, great. Thanks so much 🙂
Poori were very crispy and nice, thanks again 🙂
You are very welcome Sweety!!!
Hi Dhwani, can we use the stand mixer for kneading the dough for Pani puri?
Hi Reena
Yes absolutely.
Hi…noted for sooji panipuri. .can u pls advise on aatta(wheat) pani puris recipe too..thx in advance
Do we mix oil with the flours before kneading…
Yes Nishi!!!Mix oil with all the flours as mentioned in first step.
thanks.
Appreciate your work!! Step by step pictures with video is amazing.
Hello Dhwani..DId you change your recipe? Earlier I didn’t remember adding wheat flour for poori ..I made it almost 2 years ago that time it was perfect..so just making sure 🙂 Please let me know..
Hi Sweety!!
yes I changed the recipe. You are right, in my old recipe, there was no wheat flour added. That recipe was also good. But I got better result with adding little bit flour. 🙂
Thanks 🙂
Hi,
I have been looking for good tortilla maker especially to make puri for pani puri.
Can you please suggest good brand and which one are you using?
Hi, I use this https://www.bedbathandbeyond.com/store/product/cucinapro-flatbread-maker/1018827808 from bed bath and beyond.
The puris puffed up well but when Ifelt that they needed to be placed in the oven they were too try. Could u please help me with this. Pani was good. I really long to make perfect golguppa
It was the perfect recipe to make pani puri! Making it tomorrow, hope it’s going to be good. Thanks for sharing this.
Hey
Very good receipe.
Just 4 pointers to newbies –
Diced potatoes same size as chick peas is better, mashed potatoes if you’re in a rush.
I dice the potatoes and then pressure cook it. Be careful not to over boil or cook it.
To me Boondi is just a filler no need, and
Onions Is too strong and take away the taste of the Pani Puri but in the sev puri or dahi puri it tastes awesome.
Everyone has their own taste of the Pani. So serving Pani and chutneys separately is the best!
Enjoy
Thanks. 🙂
Hi!
Thank you for sharing this recipe. I always have trouble making the perfect puris while preparing Pani Puri. But following your tips made it easy and my puris came out perfect for the first time ever!
Thank you so much!