This deep-fried delightful snack, Bhakarwadi is also known as Bakarwadi, is one of the popular snacks from Western India. It is famous for its irresistible flavor and texture and its enticing look. Once you start munching on them it’s highly impossible to stop!
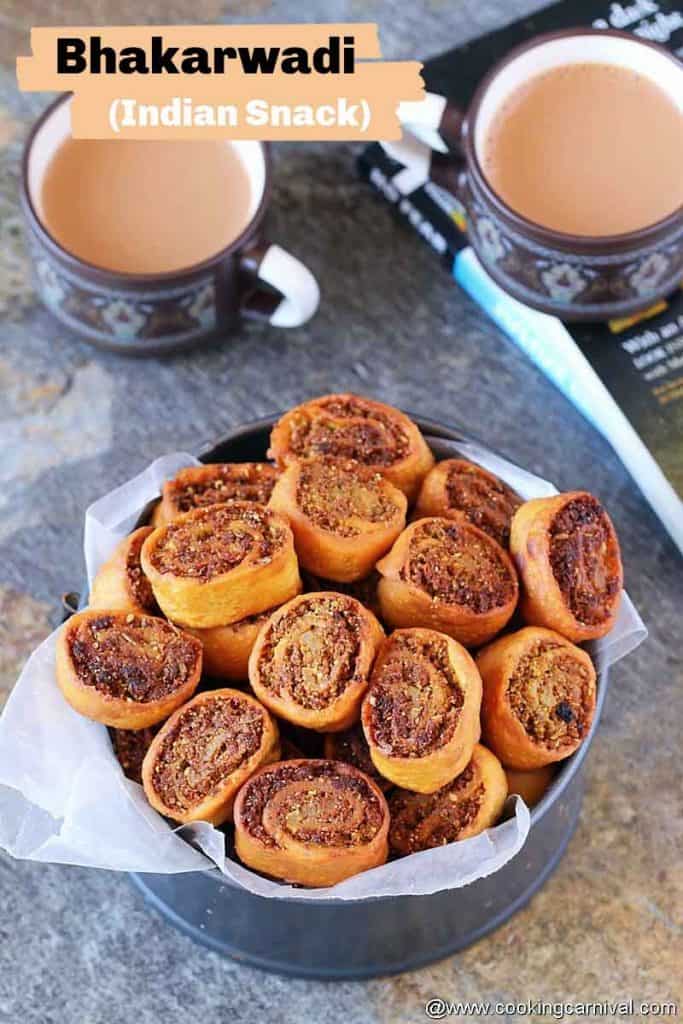
If you have been following my blog, you would know, I am all geared up preparing some delectable Diwali snacks and sweet recipes for this year.
While last week, I posted the recipe of Indian butter cookies, Nankhatai, this week I am sharing this wonderful and lip-smackingly good, Bhakarwadi recipe with you all.
Do give this a try, you would never buy those store ones again. 🙂
Jump to:
What is Bhakarwadi?
Bhakarwadi is a traditional Gujarati, Maharashtrian and Rajsthani spicy snack.
It is a deep-fried pinwheels (or call it swiss roll) shaped snack, made of Gram flour, all-purpose flour, and whole wheat flour which is filled with a tangy, spicy, and sweet nutty filling.
The filling is really strong and aromatic. It has roasted seeds and nuts (cumin, coriander, sesame, poppy, coconut, peanut) which brings gentle warming flavors, and adds the right amount of texture, delectable taste, and crunch which you can feel in every bite.
This is typically made during the festival celebrations like Diwali and Holi as a savory snack with other popular sweets.
You can also make them and enjoy your evening tea. Or make them in advance for your next tea party. They make a wonderful tea time snack no one can resist.
Making Bhakarwadi at home is very simple and easy. However, it takes a little time, patience, and some practice to make this.
But trust me, all the efforts are worth it when you take a bite!
This Indian tea-time snack recipe
- is simple and easy to prepare, crispy and delectable.
- is full of addictive flavors.
- has a good shelf life
- can be stored at room temperatures for weeks,
- is a good travel companion to munch on,
- can be baked instead of deep-frying which will turn into a healthy snack
- are Kids approved
- are really addictive.
- goes perfectly well with a steaming cup of chai or coffee.
Ingredients required to make Bhakharwadi
There are 2 parts of this recipe –
- Dough
- Masala/Stuffing
For the dough, you will need
- Flour – I have used Whole wheat flour, all-purpose flour, and Gram flour (Besan) in this recipe. However, if you are not comfortable using all-purpose flour then you can replace it with whole wheat flour (atta). You can also use a combination of all-purpose flour and whole wheat flour.
- Fat – I have used peanut oil. You may use ghee too.
- Salt

For the stuffing/filling/masala
A lot of fresh garlic, ginger-chili paste, whole spices, ground spices, seeds, and nuts are used to make the stuffing.
Peanut, sesame seeds, poppy seeds, fennel seeds, cumin seeds, coriander seeds, dry grated coconut, red chili powder, turmeric powder, garam masala, salt, ginger-chili paste, garlic, sugar, and lemon juice.
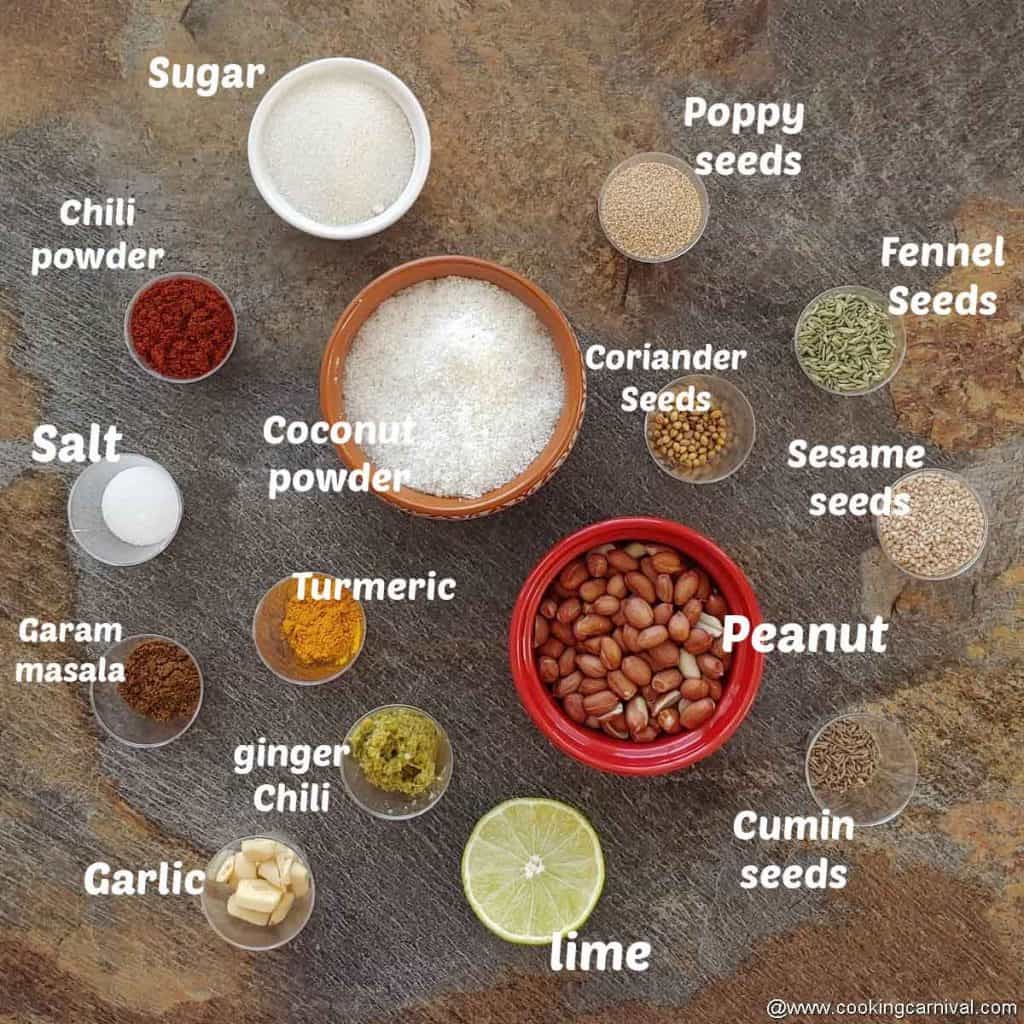
How to make this recipe? Step by step process
For easy understanding, I have divided this recipe into 4 steps.
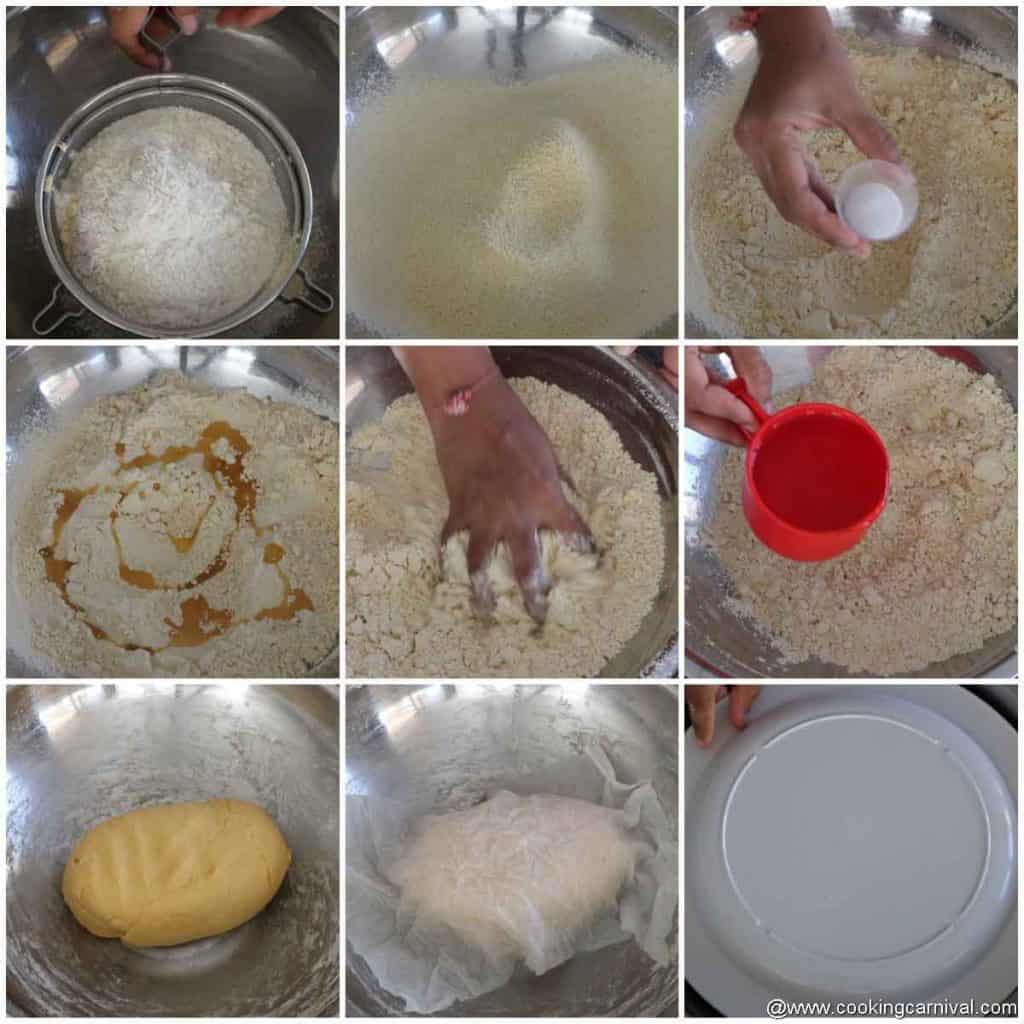
Step 1 – Make a dough
To a large mixing bowl, sieve the besan, all-purpose flour (maida), and whole wheat flour.
Then add salt and hot oil.
Mix it well by rubbing the flour and oil mixture between the palms and using your fingertips. Keep mixing until it oil is well incorporated in all of the flour mixtures. This would take about 2 minutes.
At this point, the mixture should resemble crumbs and holds shape. To check, take some flour mixture between your palm and make a fist. If it holds the shape and not crumble then you have added enough fat. If the dough falls to pieces, that means you need to add some more oil/ghee.
Start by adding the water little by little and knead it into a firm dough. The dough should be hard yet pliable and smooth. I used around 6 tablespoons cup of water here. (The amount of water depends on the quality of the flours.)
Cover the dough and let it rest for 20 minutes.
Step 2 – make stuffing
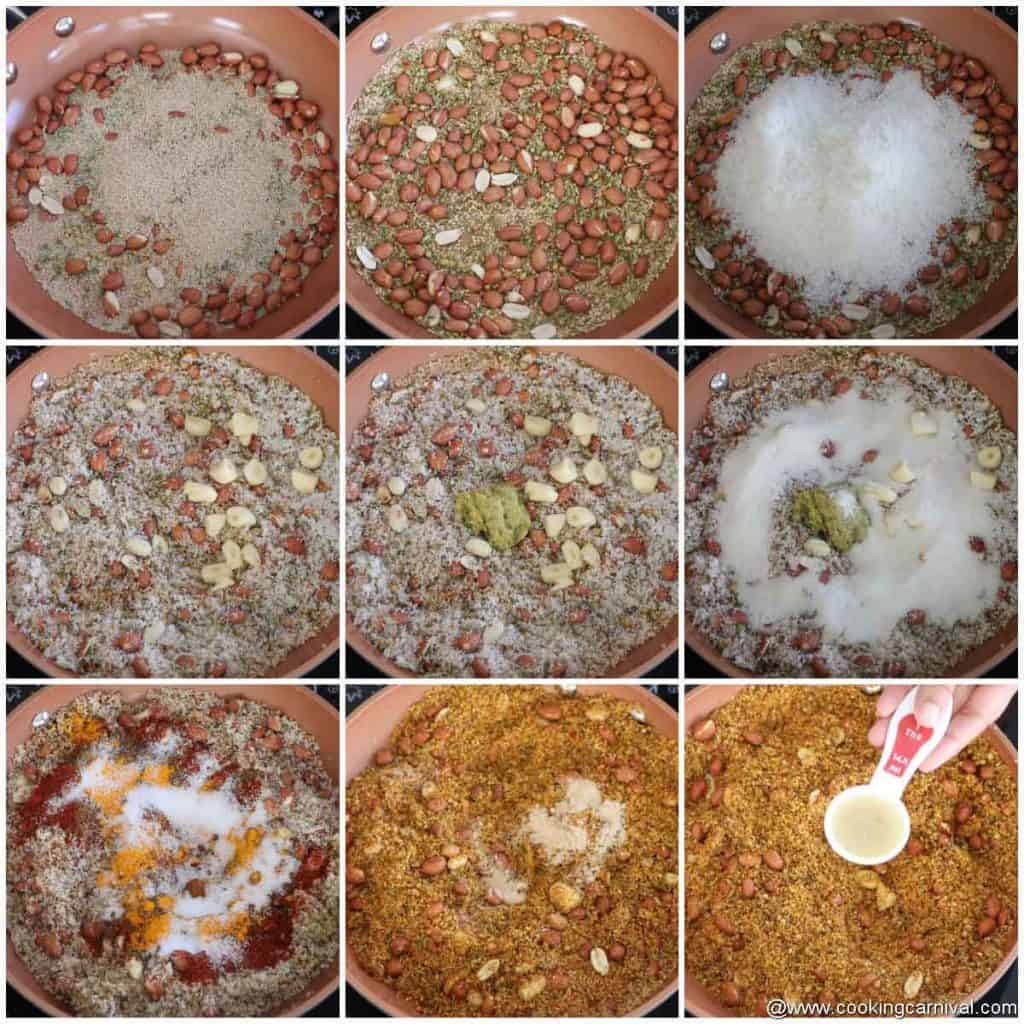
Heat a non-stick or heavy pan. Once hot turn the heat settings to low.
Add peanut, sesame seeds, fennel seeds, cumin seeds, and poppy seeds.
Roast for 4 minutes on low heat.
Then add coconut and dry roast for around 40 seconds.
Add garlic, ginger-chili paste, and sugar. Roast for few more seconds.
Next, add red chili powder, salt, turmeric powder, and garam masala. Keep stirring continuously.
Add Hing and lemon juice and mix well.
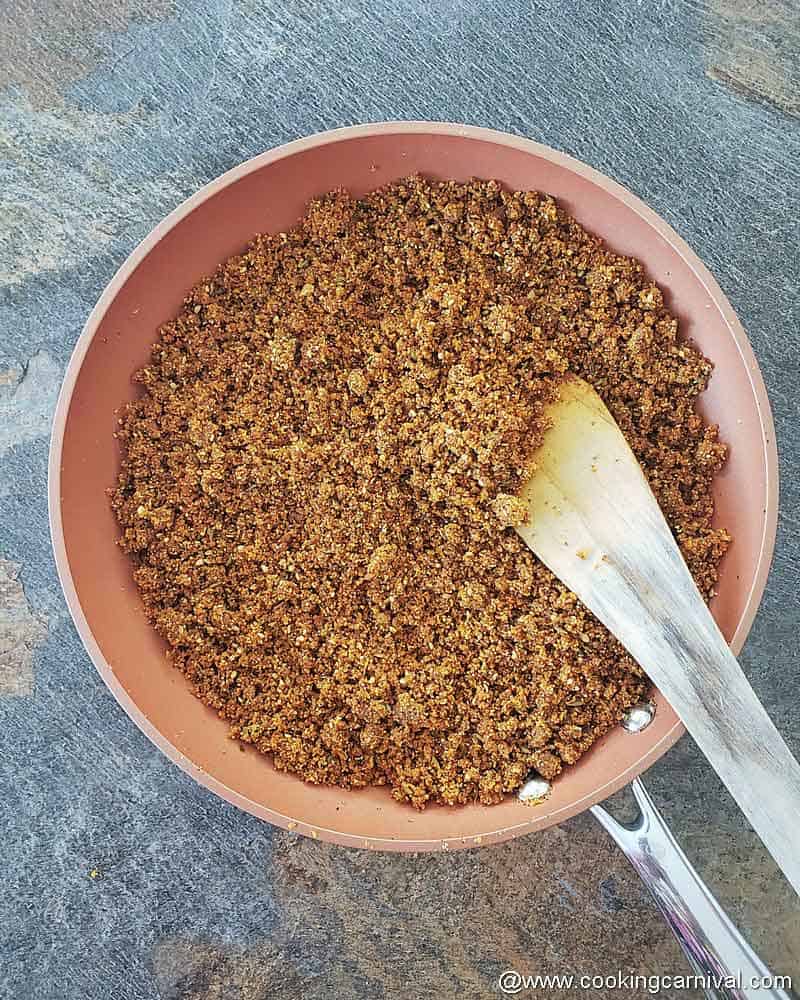
Turn off the heat and let the dry mixture cool down slightly.
Transfer dry mixture to a spice blending jar.
Blend into a coarse powder. Transfer stuffing to a bowl.
If the mixture looks dry, add a couple of tablespoon of water. Mine was dry, so I have added 3 to 4 tablespoon water to make it a bit moist. The mixture should be moist and holds shape. To check, take some mixture between your palm and make a fist. If it holds the shape and not crumble then you have added enough water. If the mixture falls to pieces, that means you need to add some more water.
Keep the stuffing aside.
Step 3 – assembling and folding bhakarwadi in to spirals
Once the dough has rested for 30 minutes, uncover it. Add a few drops of oil and knead again for a few seconds.
Divide the dough into 6 equal portions. (If you want to make mini bhakharwadi, divide it into 18 parts).
Apply some oil on the rolling board or work surface.
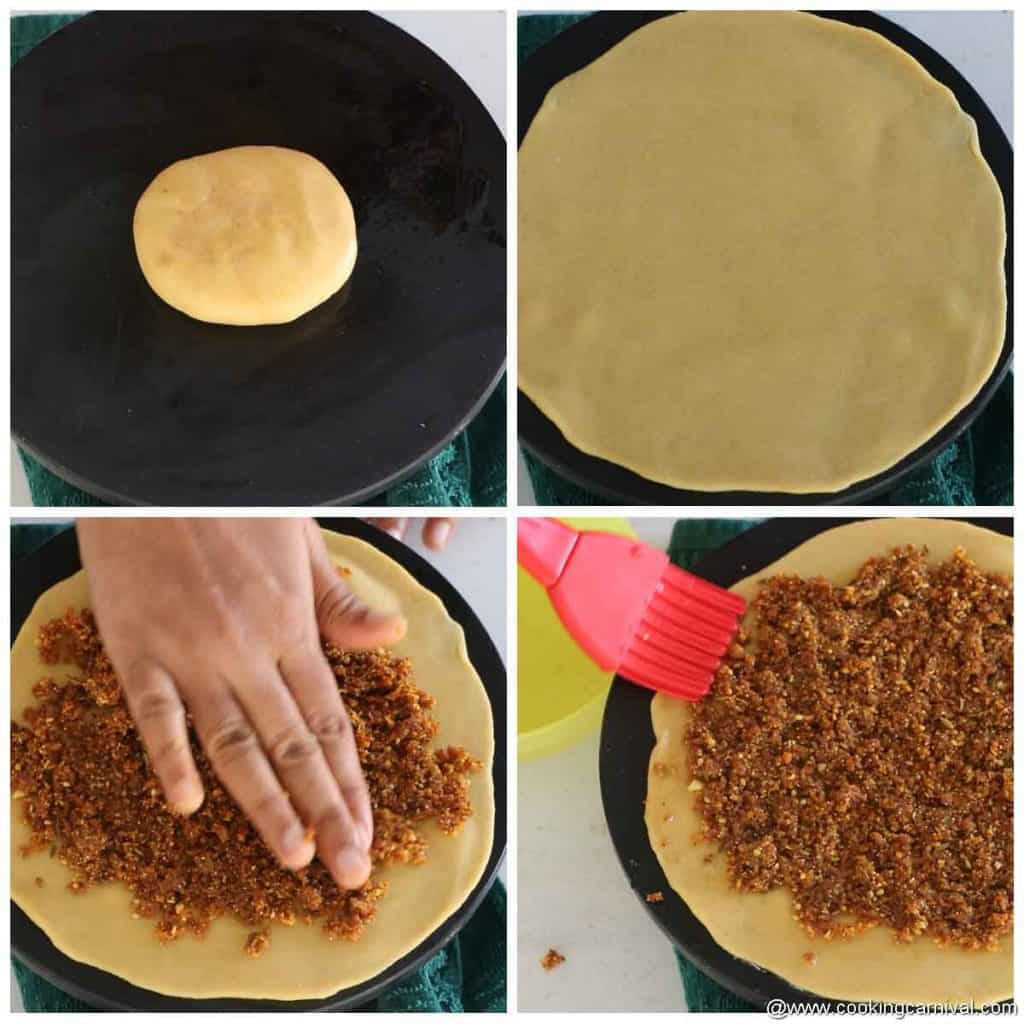
Take one portion of dough and roll it between your palms to get to make a ball.
Flatten it and make more balls with the remaining dough.
Roll each ball into a uniform disc, about 7 to an 8-inch diameter which is slightly thicker than roti.
Add about ⅙ of stuffing to the center of the disc.
Evenly spread masala on the disc using a spoon or fingers, leaving the sides.
Also lightly press the masala layer with your fingers or spoon. This step would ensure that masala sticks well on the roti.
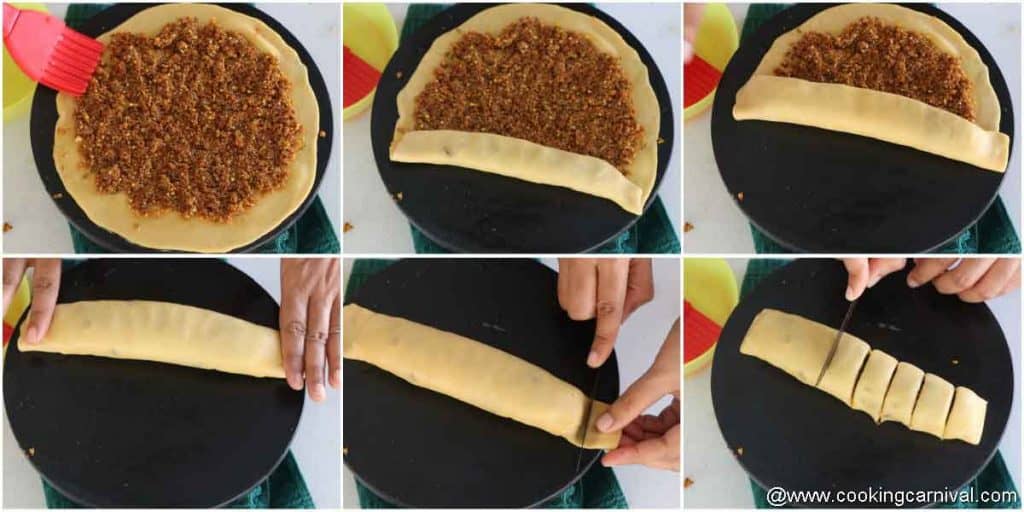
Apply water on the edges.
Now begin to TIGHTLY roll the dough from one side, making sure there is no space.
Roll it into a tight log or a cylinder.
Keep rolling further until the edges are sealed and you get a smooth log.
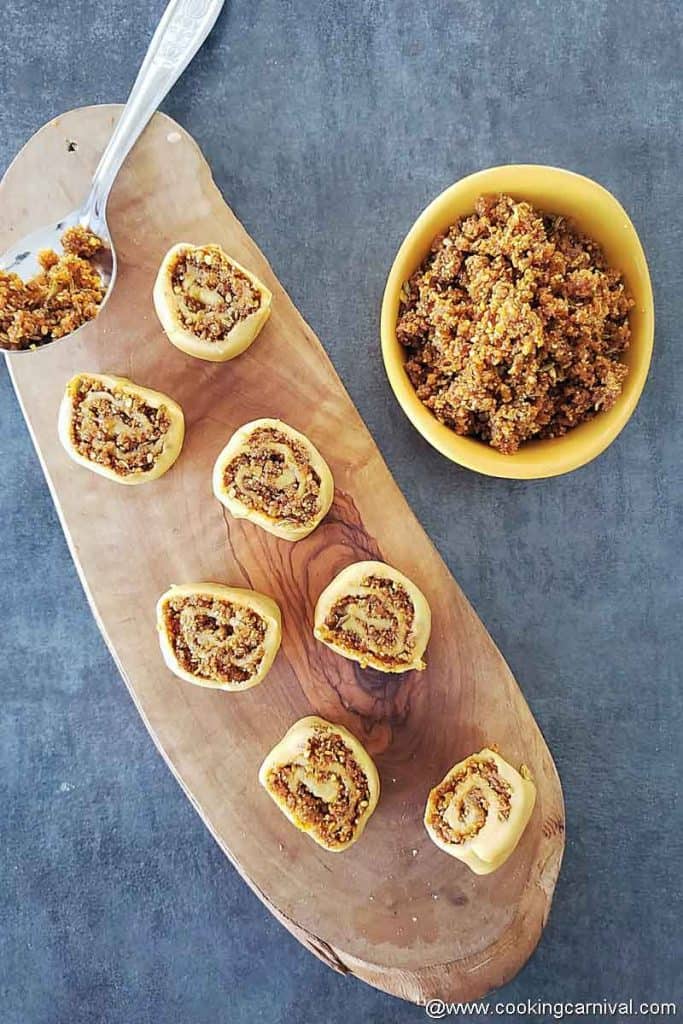
Trim the edges and cut the rolled log into 2 cm sized pieces pinwheels. You will get about 7 to 9 pinwheels.
Gently press and a little bit flatten each pinwheel on the top using your fingers. (Don’t press too much, just press a little bit).
This way make bhakarwadi with the remaining dough. Once done, arrange them in a layer and cover them with a kitchen towel.
Step 4 – Frying
Heat oil in a pan over medium heat.
To test if the oil is hot enough, add a tiny piece of the dough ball to the oil and if it sizzles, and slowly comes on the surface, your oil is ready for frying.
Once the oil is hot, turn the heat to low.
Add bhakarwadi pinwheels into the hot oil. Do not overcrowd the pan with bhakarwadi.
Fry them at low heat. Do not stir often.
Once the one side is lightly golden, flip the bhakarwadis with a slotted spoon and fry them from the other side.
Keep flipping and stirring occasionally till they turn golden brown and crisp.
Drain them on a kitchen towel-lined plate to remove the excess oil.

Let them cool completely.
Bhakharwadi is ready. Serve them with some hot masala chai.
Or store them in an airtight container for up to 2-3 weeks.

Notes and pro-tips
Making perfect crispy Bhakarwadi is easy. There are a few important things to keep in mind while making this recipe to get the best results.
The trick of making the best bakarwadi lies in the temperature of oil, stiffness of dough, accurate and moist stuffing along with rolling and cutting technique.
Bhakarwadi shouldn’t leak when fried in oil, and they will not leak if you follow these useful tips for making your best homemade bhakarwadi.
Dough
- Make sure the dough is semi-soft, not too soft not too stiff.
- Always add hot oil to flour. This would give you the best tasting crispy and crunchy bhakarwadis.
- Resting the dough for at least 30 minutes is a very important step, don’t skip it.
Stuffing
- The masala needs to have all the spices and flavors in the right proportions. Meaning there should be a perfect balance of sweetness, tanginess, and spiciness in the stuffing.
- Make sure the stuffing is WET (Refer a video for better understanding). If the stuffing is really dry, everything will come out while frying and will be a total mess.
- This recipe makes slightly spicy Bhakarwadis. You can adjust the amount of heat according to your taste preference.
- If you don’t want to add or don’t have on hand garam masala, then you can also add cinnamon powder and clove powder to the stuffing.
- I have added Kashmiri red chili powder to this recipe. Kashmiri red chili powder is less hot compare to regular chili powder. Adjust the amount of spiciness according to your liking.
- You can skip Ginger-chili paste and garlic if you don’t prefer to use it.
- If you want to make them less spicy, then skip green chili paste.
- To give a tangy taste, I have used lime juice. You can use tamarind pulp(imli ka paste) or dry mango powder (amchur powder) too.
- Some people like to add some sev to bhakarwadi masala for an additional crunch. If you like you can also add some sev in the masalas while grinding.
- We love a good amount of stuffing in our bakarwadis. Stuff according to your liking. You can store the remaining masala in the freezer and make the bhakharwadi again after a few weeks. Or you can use leftover stuffing to make curry or sabzi.
- You can make Masala/stuffing ahead of time to make the process a little bit easy. Make masala and store them in the freezer, stays fresh for up to 6 months when stored in an air-tight container.
Rolling and shaping
- Roll them into 7 to 8-inch diameter disc.
- The rolled disc should be neither too thick nor too thin.
- Make sure to press the masala layer with a spoon or hands. This step would ensure that masala sticks well on the dough circle.
- You need to roll the dough very tightly and carefully so that the stuffing does not spill out while frying.
- Make sure there is no space while making a log. The log should be tight.
Frying
- While deep frying these, you have to take extra precautions with the temperature and flame intensity. Oil should be hot enough, yet bakarwadi has to be fried at low temperatures. Otherwise, the roll may open and spill the spice stuffing.
- Do not fry on high heat or else the bhakarwadi would stay soft and uncooked from inside.
- If accidentally your oil is spoiled, then DO NOT FRY the next batch in the same oil. Turn off the heat, let the oil cool down slightly and then pass it through a strainer and a couple of times. And then fry the next batch.
- Do not stir bhakarwadi often. Flip them once they are fried from one side and float up to the surface.
- You can easily double or triple this recipe.
Quick FAQs
Of course, you can!
The only challenge with this recipe is the frying part because the filling has the tendency to spill into the oil if not rolled perfectly, which may turn this whole recipe into a huge mess.
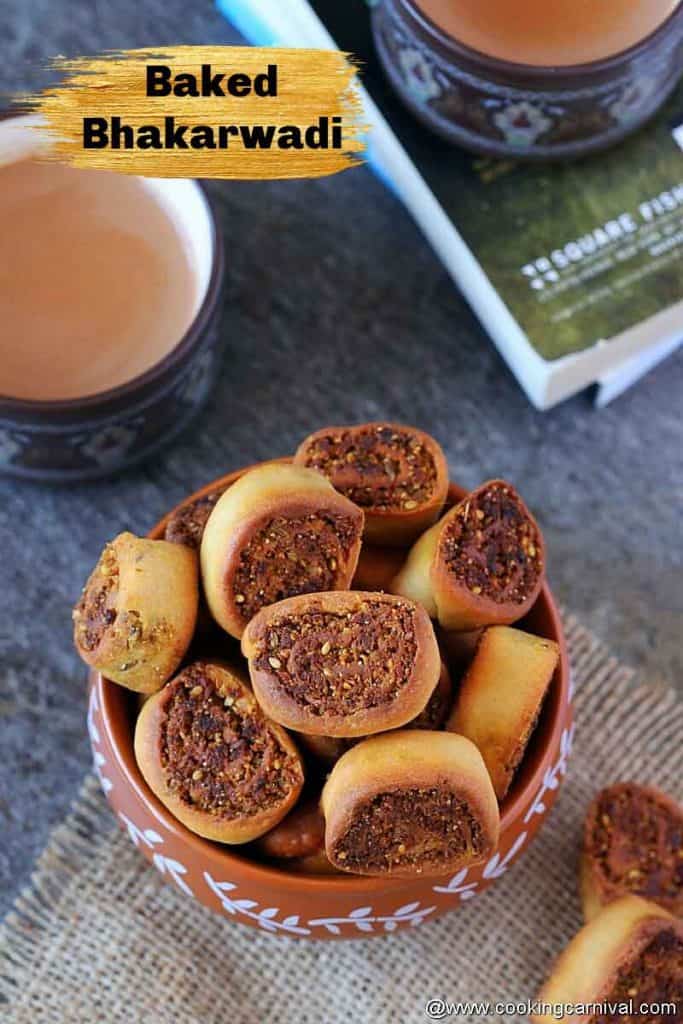
Today I’ve baked half of the batch in the oven and let me tell you that baking made them just way more irresistible!
Baking made the whole cooking process much simpler and it wasn’t so calorie induced with loads of oil.
I was surprised with the outcome of the baked version.
You will find it hard to stop yourself from eating 4-5 at once.
Here is the process
Preheat oven at @350 degrees F(180 degrees C).
Arrange the Bhakarwadi on a baking tray.
Place the tray into a preheated oven and let it bake for 15 minutes on the middle rack.
After 15 minutes flip it to the other side and bake it till it gets golden color for another 8 minutes. Please keep an eye to ensure it does not get burnt.
Once it’s done, remove it from the oven and let it cool down.
When cooled, store in an airtight container lined with kitchen tissue.
Serve crispy baked Bhakarwadi as an evening snack with a hot cup of tea or coffee.
The baked result – crispy edges with a soft and chewy inside and loads and loads of flavors. The spicy, sweet, and tangy filling imparts an explosion of flavors in your mouth.
On top of all, I can guiltlessly enjoy these pretty-looking spirals. 😉
Bhakawadi snack has a longer shelf life and storing them for weeks is fairly simple. After frying or baking, let the Bhakarwadis cool down completely.
Once cooled, you can store them in an airtight container lined with a Kitchen tissue. These stay fresh for up to 2-3 weeks.
To make a mini version, roll the dough in a small disc. Instead, of dividing the dough into 6 parts, divide the dough into 18 parts and roll. That way you will get a mini version.
As for this snack, you need to make them know how they taste. They will seriously become a staple in your home and I can assure you that you will make it again and again.

More Snack Recipes
Have you tried this Recipe? Please feed us with your feedback, ★ star ratings, and comments below.
You can also FOLLOW me on FACEBOOK, INSTAGRAM, and PINTEREST for more fabulous recipes and updates.
Subscribe to our YouTube Channel for tasty and easy video recipes.
Bhakarwadi
Ingredients
For dough
- ⅓ cup maida all-purpose flour
- 1 cup whole wheat flour atta
- 1 ½ cup besan gram flour
- 2 tablespoon oil
- ½ teaspoon salt
- ¾ cup water or as needed
For stuffing
- 1 teaspoon cumin seeds
- 1 teaspoon coriander seeds
- 1 cup dry coconut grated or powdered
- 2 tablespoon poppy seeds khus khus
- 3 tablespoon sesame seeds Till
- 2 tablespoon fennel seeds saunf
- ¾ cup peanuts
- 2 tablespoon Kashmiri red chili powder
- ½ teaspoon turmeric powder
- 1 teaspoon garam masala
- salt to taste
- 2 tablespoon lemon juice
- 5 tablespoon sugar
- ½ teaspoon hing
- 2 teaspoon ginger-chili paste
- 1 tablespoon – chopped garlic
- oil for frying
Instructions
Step 1 – Make a dough
- To a large mixing bowl, sieve the besan, all-purpose flour (maida), and whole wheat flour.
- Then add salt and hot oil.
- Mix it well by rubbing the flour and oil mixture between the palms and using your fingertips. Keep mixing until it oil is well incorporated in all of the flour mixtures. This would take about 2 minutes.
- At this point, the mixture should resemble crumbs and holds shape. To check, take some flour mixture between your palm and make a fist. If it holds the shape and not crumble then you have added enough fat. If the dough falls to pieces, that means you need to add some more oil/ghee.
- Start by adding the water little by little and knead it into a firm dough. The dough should be hard yet pliable and smooth. I used around 6 tablespoons cup of water here. (The amount of water depends on the quality of the flours.)
- Cover the dough and let it rest for 20 minutes.
Step 2 – make stuffing
- Heat a non-stick or heavy pan. Once hot turn the heat settings to low.
- Add peanut, sesame seeds, fennel seeds, cumin seeds, coriander seeds and poppy seeds.
- Roast for 4 minutes on low heat.
- Then add coconut and dry roast for around 40 seconds.
- Add garlic, ginger-chili paste, and sugar. Roast for few more seconds.
- Next, add red chili powder, salt, turmeric powder, and garam masala. Keep stirring continuously.
- Add Hing and lemon juice and mix well.
- Turn off the heat and let the dry mixture cool down slightly.
- Transfer dry mixture to a spice blending jar.
- Blend into a coarse powder. Transfer stuffing to a bowl.
- If the mixture looks dry, add a couple of tablespoon of water. Mine was dry, so I have added 3 to 4 tablespoon water to make it a bit moist. The mixture should be moist and holds shape. To check, take some mixture between your palm and make a fist. If it holds the shape and not crumble then you have added enough water. If the mixture falls to pieces, that means you need to add some more water.
- Keep the stuffing aside.
Step 3 – assembling and folding bhakarwadi in to spirals
- Once the dough has rested for 30 minutes, uncover it. Add a few drops of oil and knead again for a few seconds.
- Divide the dough into 6 equal portions. (If you want to make mini bhakharwadi, divide it into 18 parts).
- Apply some oil on the rolling board or work surface.
- Take one portion of dough and roll between your palms to get to make a ball.
- Flatten it and make more balls with the remaining dough.
- Roll each ball into a uniform disc, about 7 to an 8-inch diameter which is slightly thicker than roti.
- Add about ⅙ of stuffing to the center of the disc.
- Evenly spread masala on the disc using a spoon or fingers, leaving the sides.
- Also lightly press the masala layer with your fingers or spoon. This step would ensure that masala sticks well on the roti.
- Apply water on the edges.
- Now begin to TIGHTLY roll the dough from one side, making sure there is no space.
- Roll it into a tight log or a cylinder.
- Keep rolling further until the edges are sealed and you get a smooth log.
- Trim the edges and cut the rolled log into 2 cm sized pieces pinwheels. You will get about 7 to 9 pinwheels.
- Gently press and a little bit flatten each pinwheel on the top using your fingers. (Don’t press too much, just press a little bit).
- This way make bhakarwadi with the remaining dough. Once done, arrange them in a layer and cover them with a kitchen towel.
Step 4 – Frying
- Heat oil in a pan over medium heat.
- To test if the oil is hot enough, add a tiny piece of the dough ball to the oil and if it sizzles, and slowly comes on the surface, your oil is ready for frying.
- Once the oil is hot, turn the heat to low.
- Add bhakarwadi pinwheels into the hot oil. Do not overcrowd the pan with bhakarwadi.
- Fry them at low heat. Do not stir often.
- Once the one side is lightly golden, flip the bhakarwadis with a slotted spoon and fry them from the other side.
- Keep flipping and stirring occasionally till they turn golden brown and crisp.
- Drain them on a kitchen towel-lined plate to remove the excess oil.
- Let them cool completely.
- Bhakharwadi is ready. Serve them with some hot masala chai.
- Or store them in an airtight container for up to 2-3 weeks.
Baked bhakharwadi
- Preheat oven at @350 degrees F(180 degrees C).
- Arrange the Bhakarwadi on a baking tray.
- Place the tray into a preheated oven and let it bake for 15 minutes on the middle rack.
- After 15 minutes flip it to the other side and bake it till it gets golden color for another 8 minutes. Please keep an eye to ensure it does not get burnt.
- Once it’s done, remove it from the oven and let it cool down.
- When cooled, store in an airtight container lined with kitchen tissue.
- Serve crispy baked Bhakarwadi as an evening snack with a hot cup of tea or coffee.
- The baked result – crispy edges with a soft and chewy inside and loads and loads of flavors. The spicy, sweet, and tangy filling imparts an explosion of flavors in your mouth
Video
Notes
- Make sure the dough is semi-soft, not too soft not too stiff.
- Always add hot oil to flour. This would give you the best tasting crispy and crunchy bhakarwadis.
- Resting the dough for at least 30 minutes is a very important step, don’t skip it.
- The masala needs to have all the spices and flavors in the right proportions. Meaning there should be a perfect balance of sweetness, tanginess, and spiciness in the stuffing.
- Make sure the stuffing is WET (Refer a video for better understanding). If the stuffing is really dry, everything will come out while frying and will be a total mess.
- This recipe makes slightly spicy Bhakarwadis. You can adjust the amount of heat according to your taste preference.
- If you don’t want to add or don’t have on hand garam masala, then you can also add cinnamon powder and clove powder to the stuffing.
- I have added Kashmiri red chili powder to this recipe. Kashmiri red chili powder is less hot compare to regular chili powder. Adjust the amount of spiciness according to your liking.
- You can skip Ginger-chili paste and garlic if you don’t prefer to use it.
- If you want to make them less spicy, then skip green chili paste.
- To give a tangy taste, I have used lime juice. You can use tamarind pulp(imli ka paste) or dry mango powder (amchur powder) too.
- Some people like to add some sev to bhakarwadi masala for an additional crunch. If you like you can also add some sev in the masalas while grinding.
- We love a good amount of stuffing in our bakarwadis. Stuff according to your liking. You can store the remaining masala in the freezer and make the bhakharwadi again after a few weeks. Or you can use leftover stuffing to make curry or sabzi.
- You can make Masala/stuffing ahead of time to make the process a little bit easy. Make masala and store them in the freezer, stays fresh for up to 6 months when stored in an air-tight container.
- Roll them into 7 to 8-inch diameter disc.
- The rolled disc should be neither too thick nor too thin.
- Make sure to press the masala layer with a spoon or hands. This step would ensure that masala sticks well on the dough circle.
- You need to roll the dough very tightly and carefully so that the stuffing does not spill out while frying.
- Make sure there is no space while making a log. The log should be tight.
- While deep frying these, you have to take extra precautions with the temperature and flame intensity. Oil should be hot enough, yet bakarwadi has to be fried at low temperatures. Otherwise, the roll may open and spill the spice stuffing.
- Do not fry on high heat or else the bhakarwadi would stay soft and uncooked from inside.
- If accidentally your oil is spoiled, then DO NOT FRY the next batch in the same oil. Turn off the heat, let the oil cool down slightly and then pass it through a strainer and a couple of times. And then fry the next batch.
- Do not stir bhakarwadi often. Flip them once they are fried from one side and float up to the surface.
- You can easily double or triple this recipe.
How to store?
Bhakawadi snack has a longer shelf life and storing them for weeks is fairly simple. After frying or baking, let the Bhakarwadis cool down completely. Once cooled, you can store them in an airtight container lined with a Kitchen tissue. These stay fresh for up to 2-3 weeks.How to make mini bhakarwadi?
To make a mini version, roll the dough in a small disc. Instead, of dividing the dough into 6 parts, divide the dough into 18 parts and roll. That way you will get a mini version.Nutrition
Warm regards,
Dhwani.





Is it 1.5 tsp/ tbsp / cup of besan?
1.5 cup besan. Sorry for the confusion.