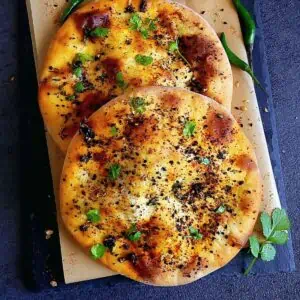
Incredibly easy to make, eggless, pillowy soft, fluffy, light, rich, buttery, and impossible to resist – these homemade Ladi Pav aka Dinner Roll recipe is a keeper. They are a perfect addition to any meal. Let’s learn how to make Mumbai style pao recipe from scratch in just 5 easy steps!

Jump to:
When I made Pav bhaji the first time after moving from India to the US, it didn’t taste as good as back home because of the bread.
Store-bought dinner rolls/burger buns here are not the same as what we get in India.
Here is the US, bread is very sweet. Plus the texture is also very different than what we get in India.
So I started making ladi pav at home. This recipe is close to fabulous Mumbai ladi pavs plus it requires very few ingredients.
I love that they have just a hint of sweetness but it's not too much like store-bought ones. They are perfect for breakfast, lunch, dinner, snack, - you name it.
There is truly no smell as amazing as fresh warm bread or pav coming out of the oven!

Ingredients required –
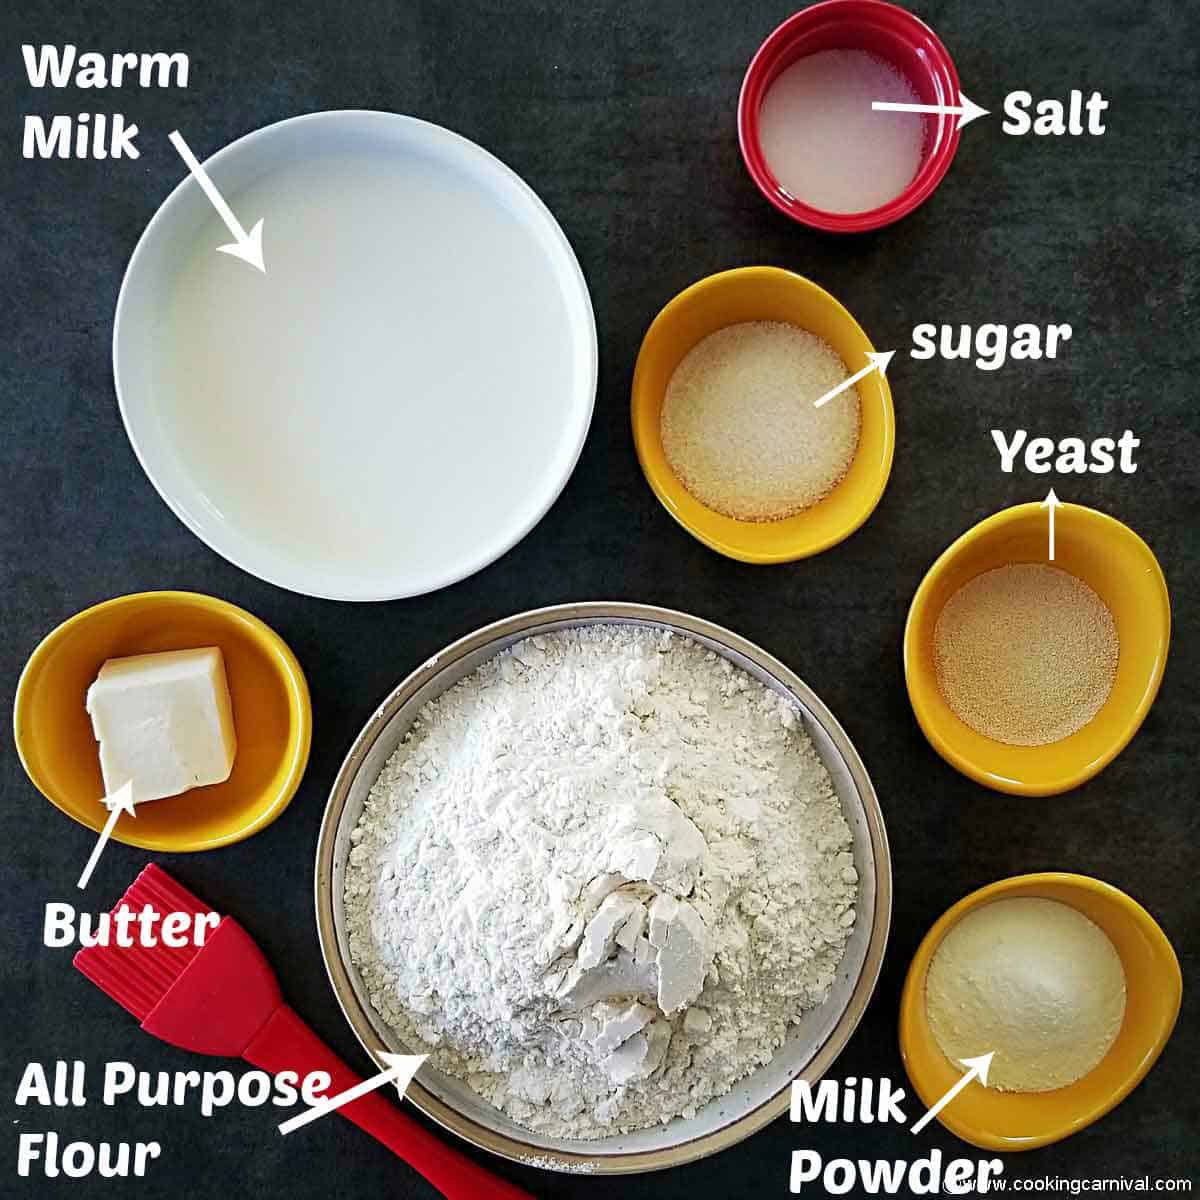
To make this recipe, you will need –
Milk: Use whole milk.
Milk powder: Milk powder makes this recipe rich.
Yeast: All yeasts will work in this recipe. If you have Instant dry yeast, it can be added straight to dry ingredients and doesn't require any sitting or proofing. Active dry yeast needs to be dissolved in a liquid before adding to a recipe.
Sugar: Sugar feeds the yeast and helps in activation.
Butter: Butter makes this roll rich. Make sure it's room temperature or melted.
Salt: Skip if you are using salted butter
Flour/maida: You can use all-purpose flour or bread flour in this recipe. You can use whole wheat flour too. The roll would be a little bit dense and not as light and fluffy. I recommend using half wheat and half white flour.
Unsalted Butter
How do you make them from scratch? Step by step process –
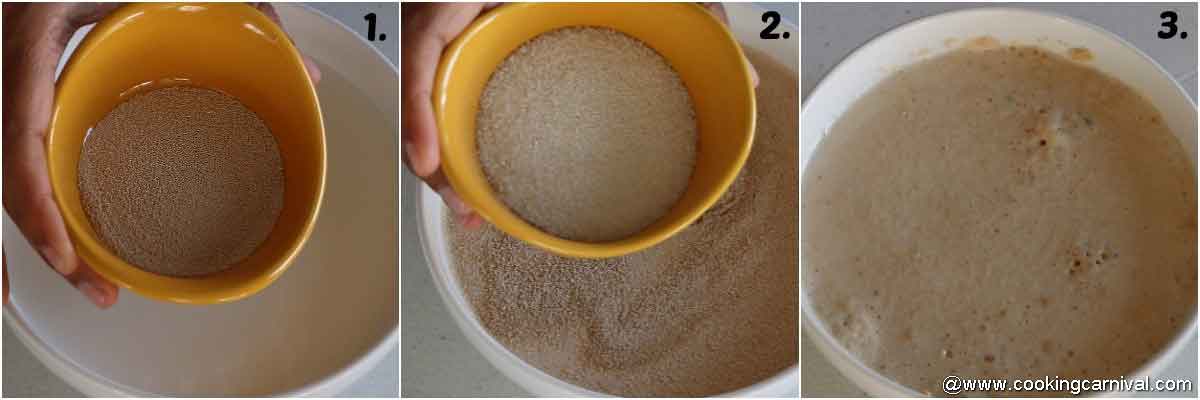
Step 1 – Activate the yeast
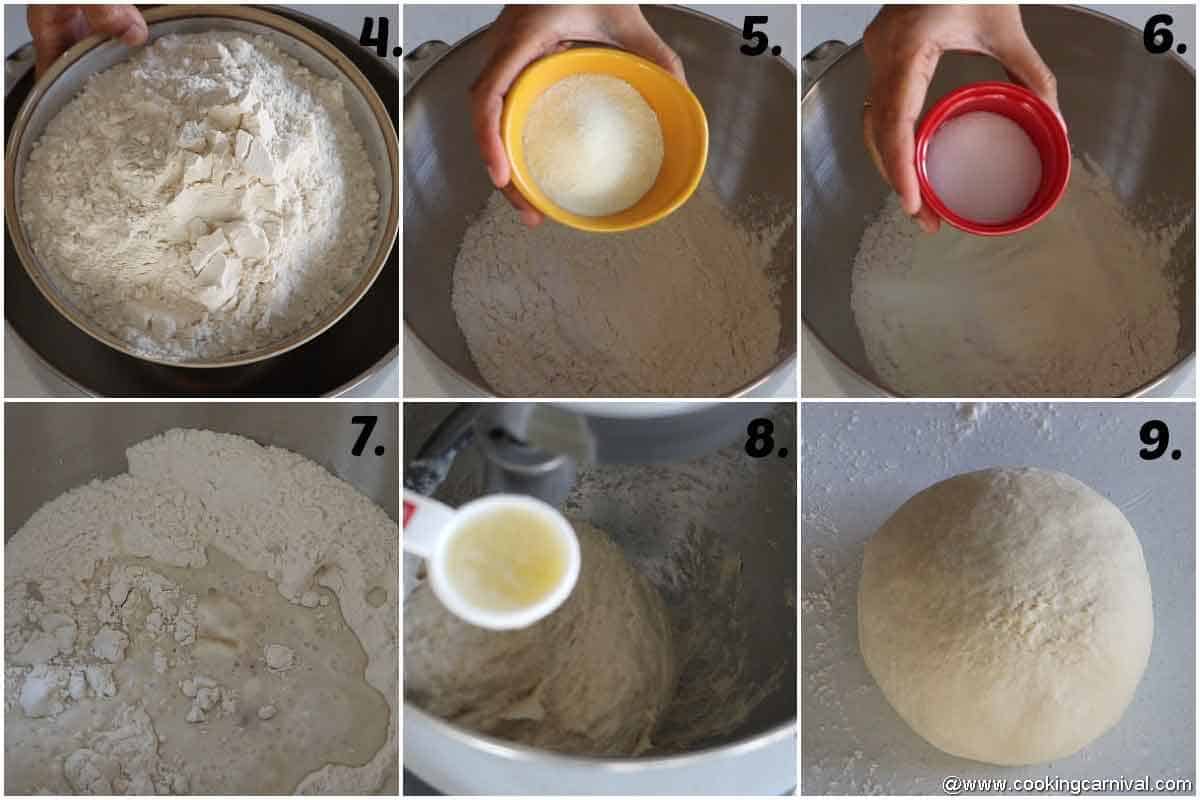
Warm milk (110 degrees, Neither cold nor hot, it should be warm), add sugar and yeast. Mix them well, close the lid and keep it aside for 10 minutes or until it gets activated. It should look frothy after 10 minutes. (Photo 1 to 3)
Step 2 – Preparing the dough
In a standing mixer bowl, take all-purpose flour, salt, and milk powder. Mix them well. (photo 4 to 6)
Add frothy yeast mixture into the flour mixture and make a dough. It should be like a sticky paste. (photo 7)
Once it comes together add the butter and knead it further for 8 to 10 minutes. (Photo 8)
It will turn from sticky mass of the dough to a beautifully soft, and tacky dough. Scrap in between if it sticks to the bowl while kneading. (Photo 9)
Step 3 – First proofing
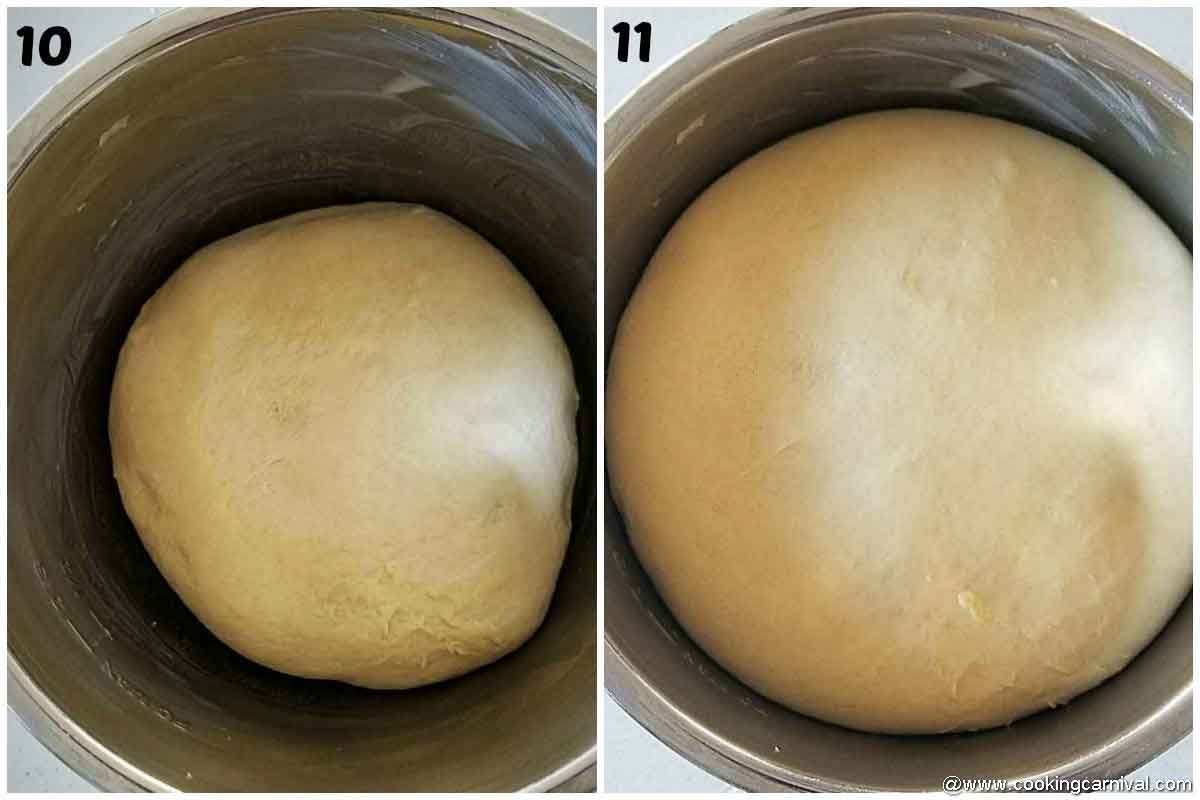
Transfer this dough in oil greased big bowl.
- To proof the dough in instant pot –
Proofing the bread dough in instant pot, especially in winter, is a game-changer. It reduces the time and gives the perfect result because of the constant heat temperature.
Grease the inner pot of instant pot with oil or butter. Transfer the dough. Place the pot into the instant pot.
Close the lid. Choose yogurt mode and set the timer to 45 minutes on normal.
- For regular method –
Oil the bowl in which you kneaded the dough and then transfer the prepared dough into it. Cover it with a cling wrap or towel and allow it to proof for 1 hour and 30 minutes until it gets double in size in a warm place.
Step 4 – Shaping the dough
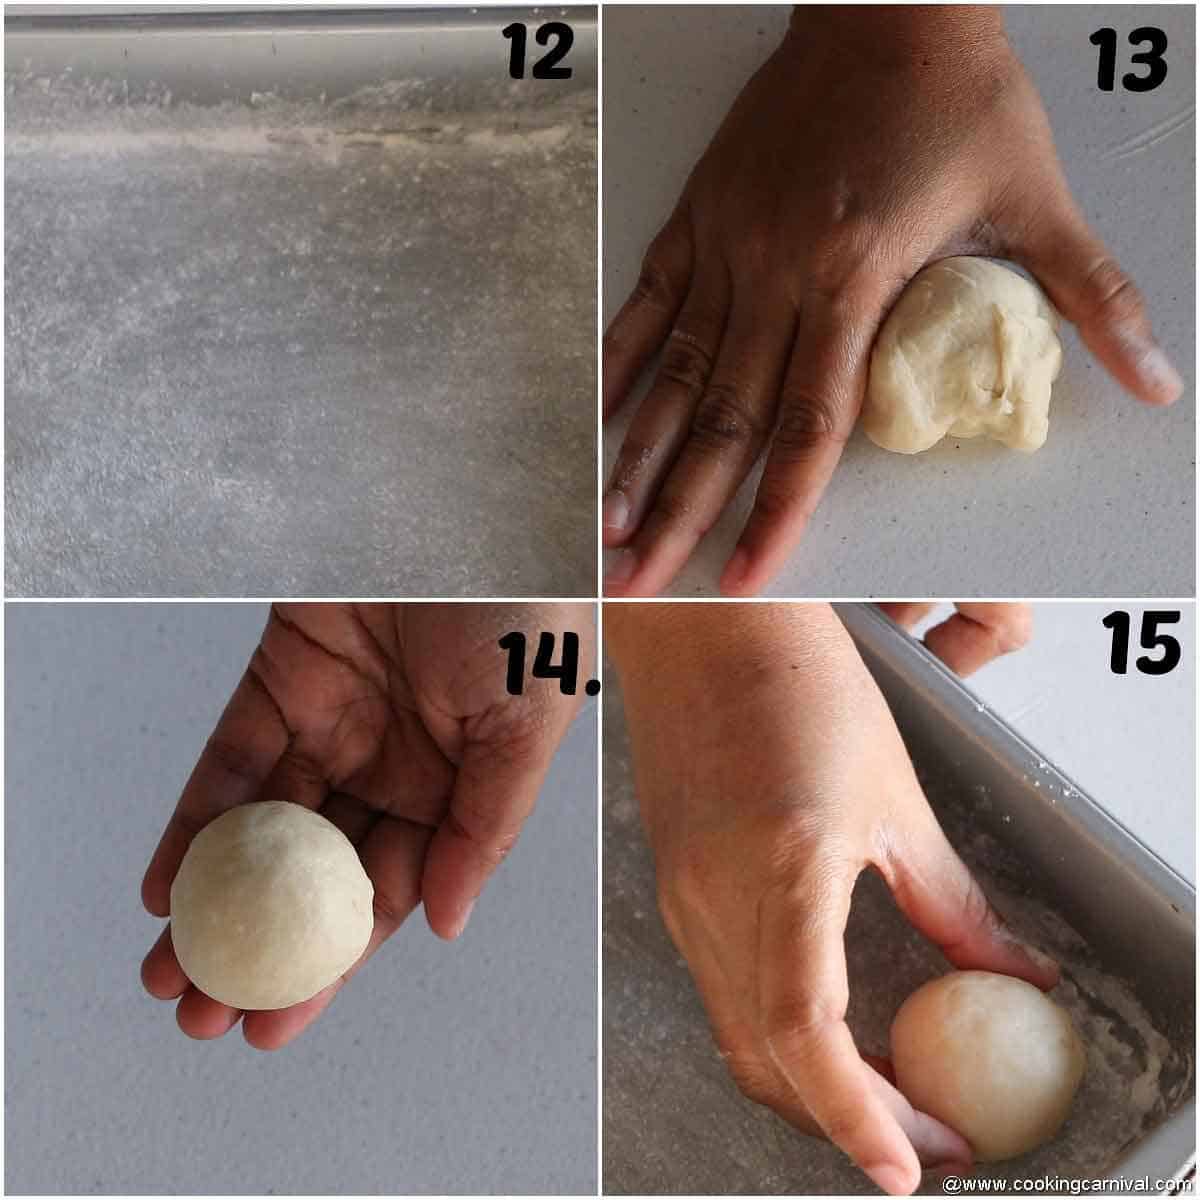
Punch the dough once. Sprinkle some(about 1 tbsp) flour on your working surface. Knead the dough for a minute. Don't add too much flour otherwise, pav will not be soft.
Measure the dough in the kitchen scale (If you have) and divide it into 20 equal parts about 50-54 grams. Or just eyeball and divide it into equal parts.
Make round shape balls by tucking the sides to the base and rounding it out using your fingers and thumb. (Refer to a video given in recipe card). (Photo 13)
Take a 9×13 inch baking pan and grease it with oil and flour. (Photo 12)
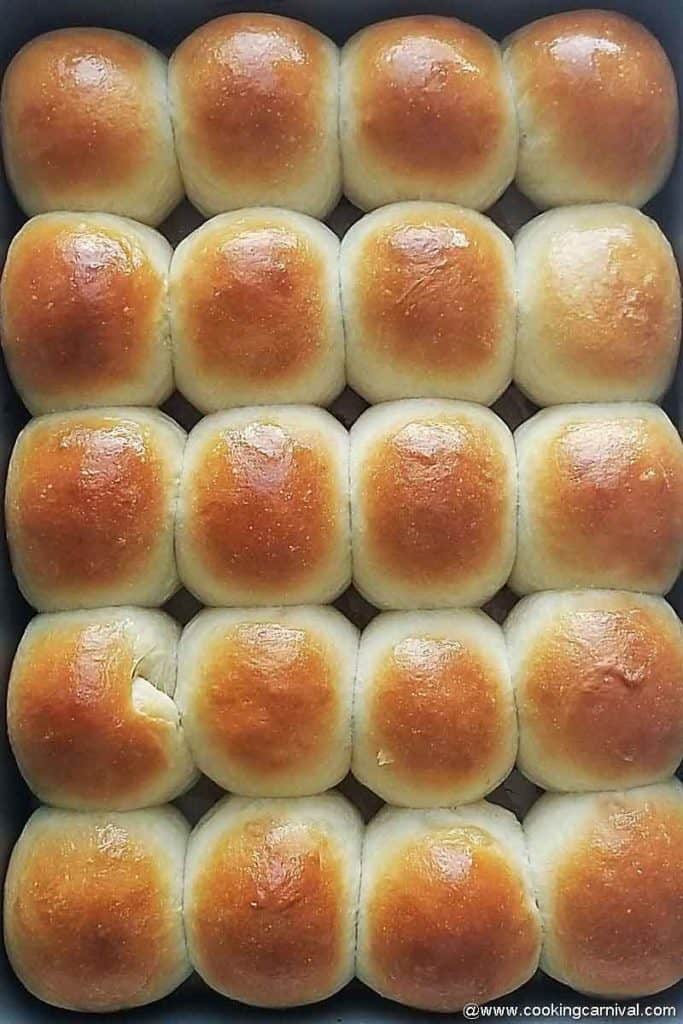
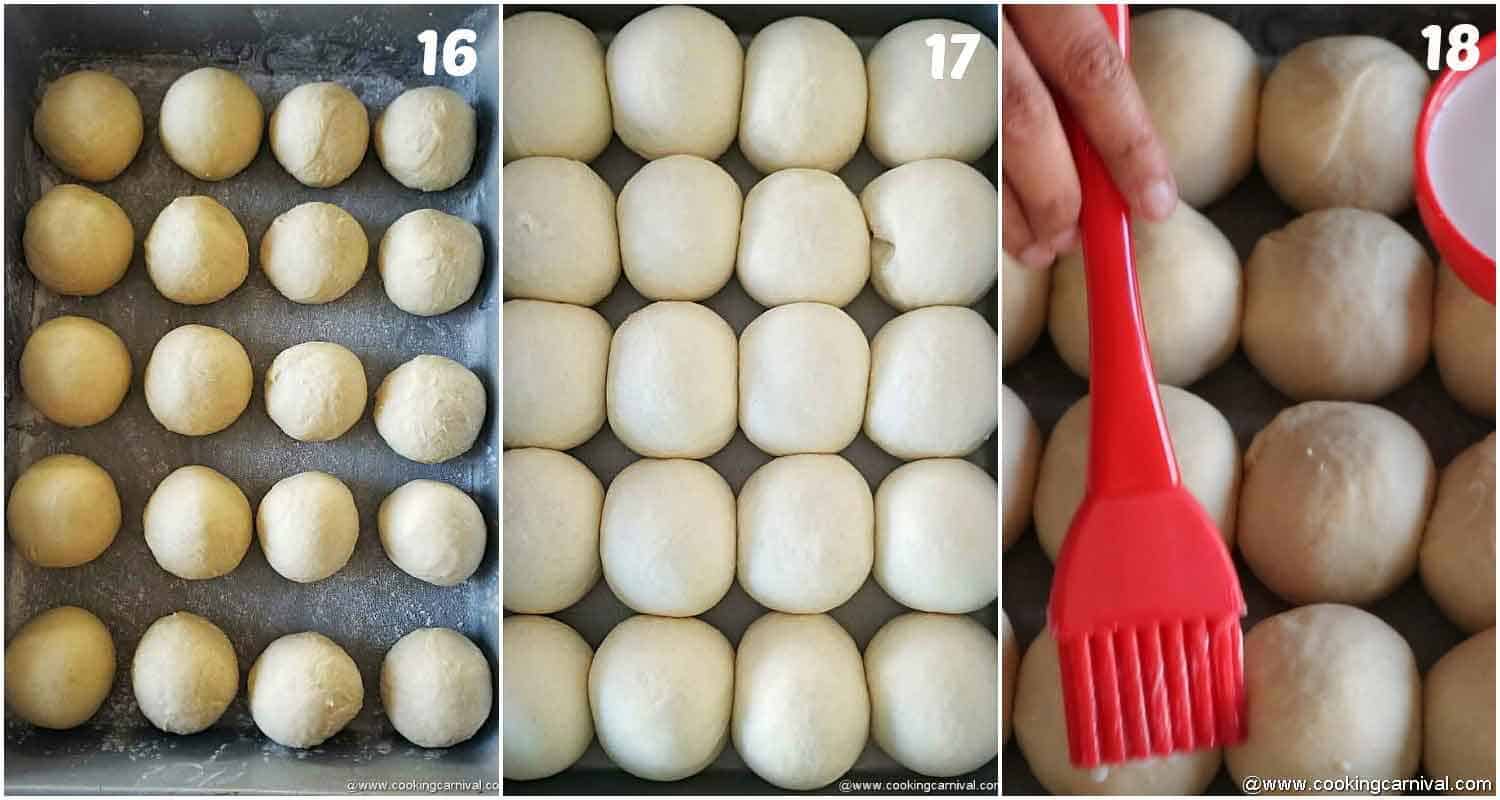
Place all the balls into a baking pan with a little gap in between. (Photo 16)
Cover the baking pan with a kitchen napkin or cling wrap and keep aside for 1 hour for second proofing. (Photo 17)
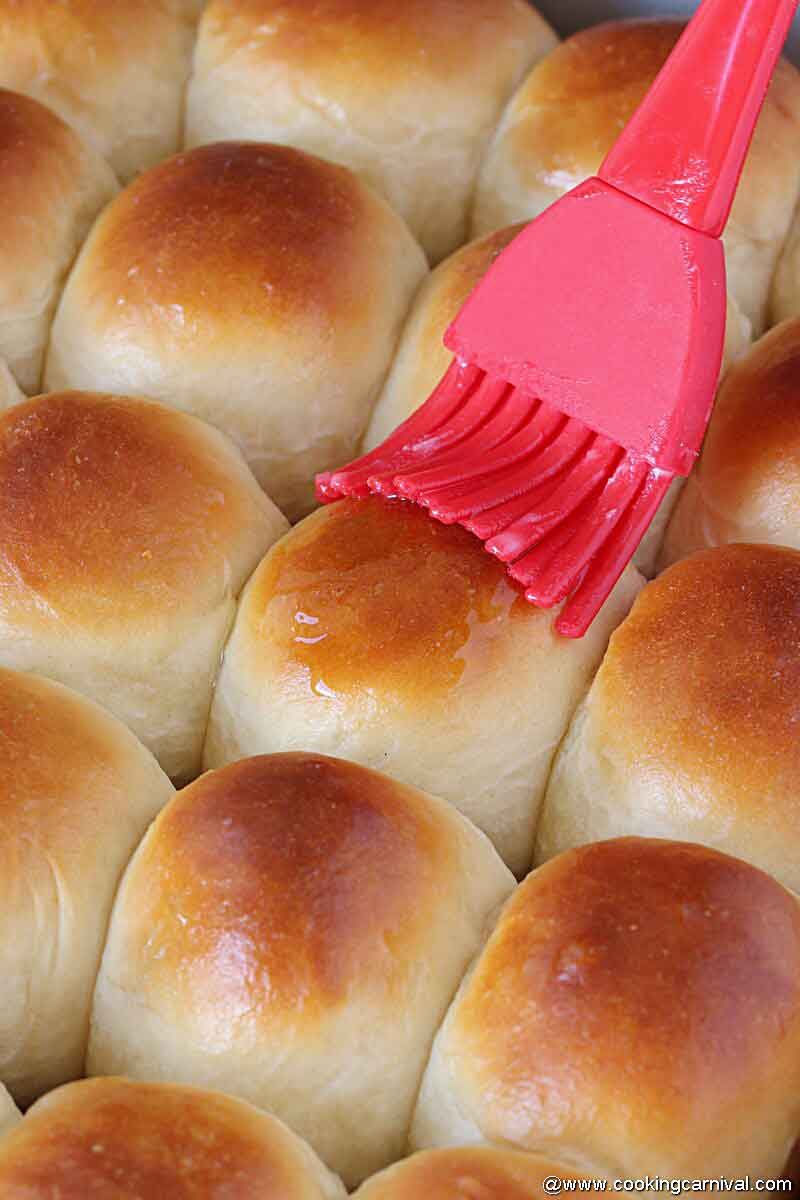
After 1 hour, gently brush pav with milk. (Photo 18)
Step – 5 Baking
Preheat oven @ 400 degrees F (200 degrees C).
Place the baking pan into the oven for 15 to 18 minutes. Keep an eye after 15 minutes.
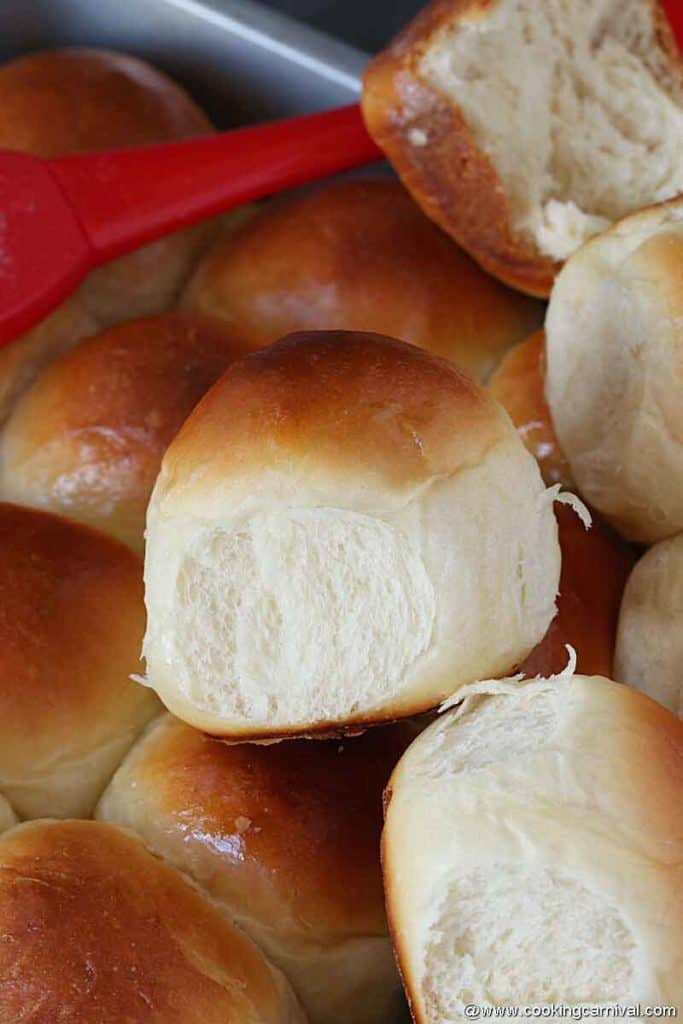
Take them out immediately and brush the top part with butter.
Enjoy it with warm with smeared butter or let it cool down completely and enjoy it with bhaji, vada, misal or any meal.
Notes, pro-tips, and quick FAQs
- To make this recipe healthy, use whole wheat flour. The roll would be a little bit dense and not as light and fluffy. I recommend using half wheat and half white flour.
- If you don’t have a stand mixer, knead the dough with your hand for at least 15 minutes to develop enough gluten.
- All yeasts will work in this recipe. If you have Instant dry yeast, it can be added straight to dry ingredients and doesn't require any sitting or proofing. Active dry yeast needs to be dissolved in a liquid before adding to a recipe.
- The dough should be well hydrated, slightly sticky, but still very soft and pliable. When you lift the dough hook of the standing mixer, you should see the dough is still sticking to the base of the pot. In easy words, You should be able to feel a soft roll just by touching the dough.
- Always sift the flour before adding any ingredients. To measure is correctly, scoop the flour and level off the top.
- I have never made this recipe with gluten-free flour. If you have tried with a good result, please share it with us in the comment box below.
- The best way to make sure that your rolls are equal in size is to weigh them using a kitchen scale. Weigh the entire batch of dough using a kitchen scale and divide that weight by 20.
- To make this recipe vegan, use almond milk instead of regular milk, skip the milk powder and use more flour, and instead of butter use oil.
- I have used a 9×13 inch metal baking pan. If you are going to bake rolls in a glass pan, it might take a few minutes more to bake.
- Make sure the milk is at the right temperature. You're looking for somewhere between 100-110F. If it gets too hot, let it sit until it reaches the right temperature. Otherwise, hot milk will kill the yeast and the yeast won’t activate.
- Don’t forget to brush the rolls once it is baked to get the glossy effect. Plus this step makes the bread softer.

Why are my dinner rolls dense?
If your rolls are dense, the reason could be –
- not kneading enough the dough mix or
- mixing the salt and yeast together.
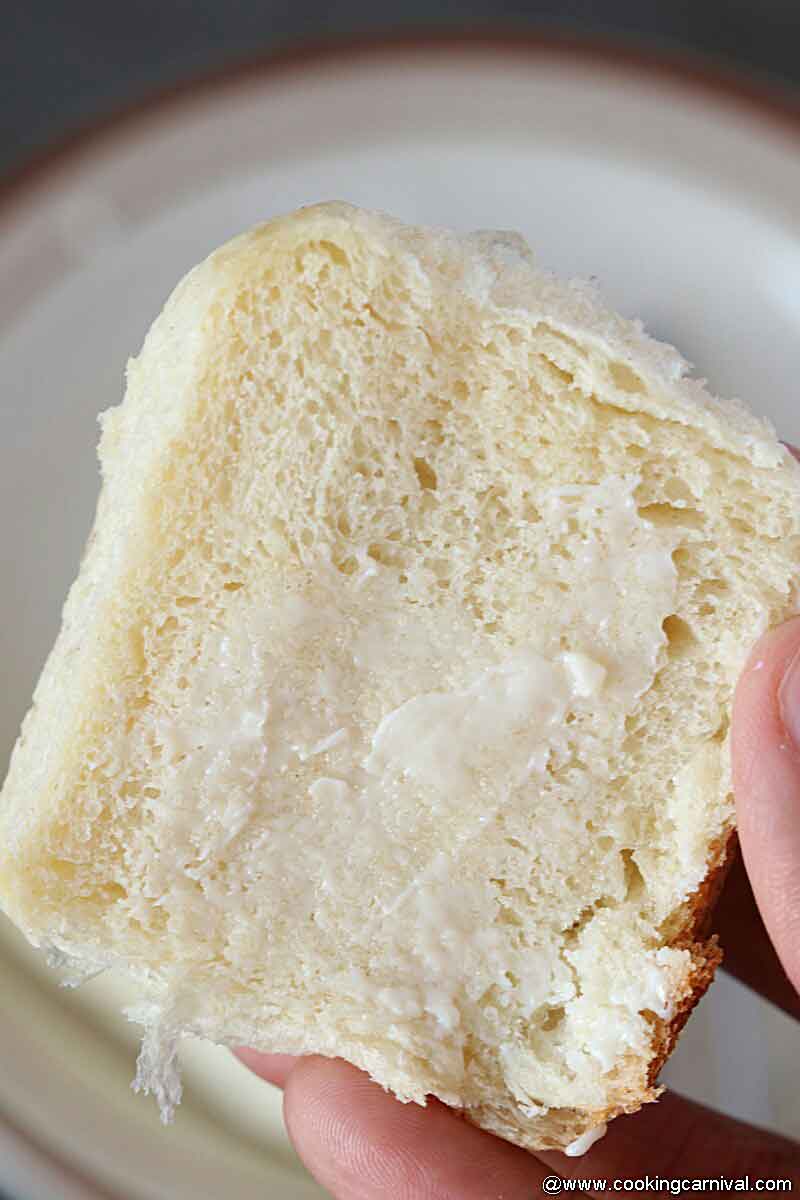
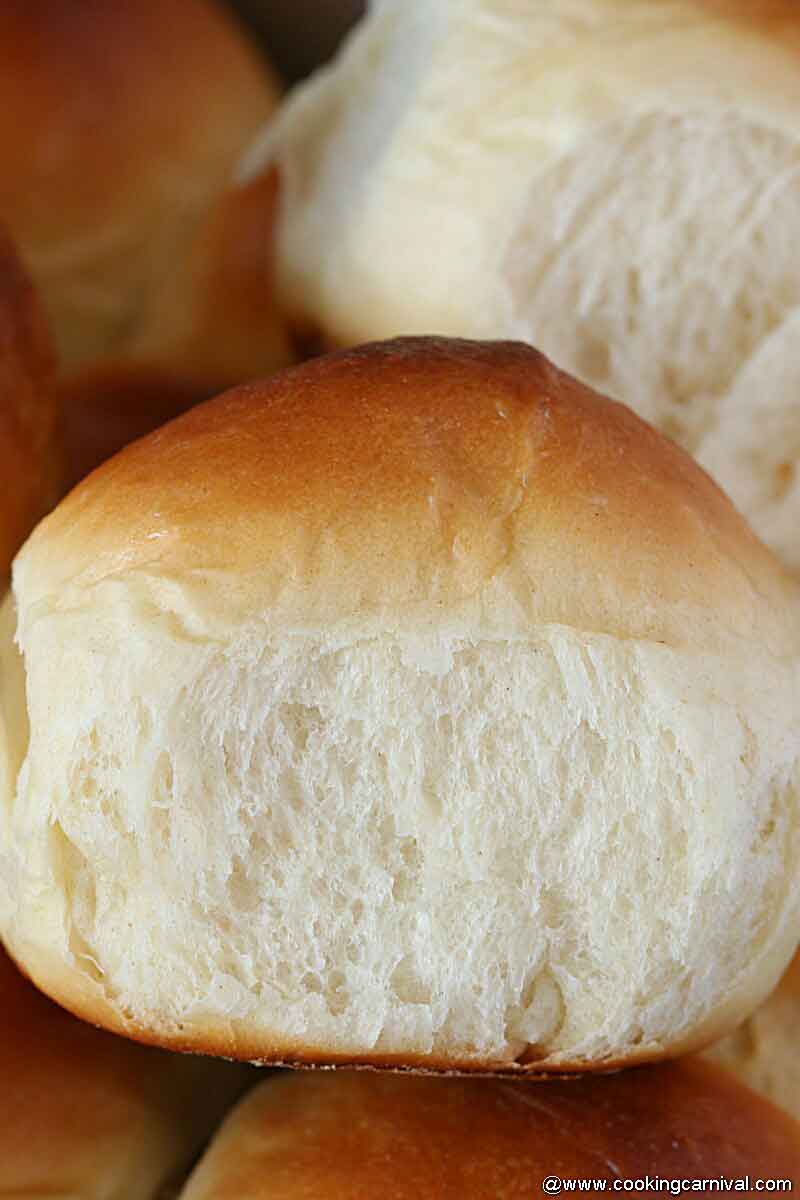
What makes the bread soft and fluffy?
Milk powder and milk make this bread super soft and rich. I would recommend not to skip this.
You guys! Just look at the soft and fluffy texture!
Our favorite bread recipes –
Croissant style dinner rolls
★ Have you tried this recipe? We'll love your feedback, Please click on the stars in the recipe card below to rate and leave your feedback in the comment box below.
Subscribe to our YouTube Channel for tasty and easy video recipes.
Pav recipe | Ladi pav
Ingredients
- 4 cups All-purpose flour / Maida
- 1 ¾ cup Warm Milk (You might need 1 tablespoon less)
- 3 tablespoon unsalted Butter
- 3 tablespoon Milk Powder
- 2 teaspoon Salt
- 3 teaspoon Active dry Yeast
- 1 tablespoon Sugar
- Milk and Butter for brushing
- Oil and flour for dusting
Method
- Warm milk (110 degrees, Neither cold nor hot, it should be warm), add sugar and yeast. Mix them well, close the lid and keep it aside for 10 minutes or until it gets activated. It should look frothy after 10 minutes. (Photo 1 to 3)
- In a standing mixer bowl, take all-purpose flour, salt, and milk powder. Mix them well.
- Add frothy yeast mixture into the flour mixture and make a dough. It should be like a sticky paste.
- Once it comes together add the butter and knead it further for 8 to 10 minutes.
- It will turn from sticky mass of the dough to a beautifully soft, and tacky dough. Scrap in between if it sticks to the bowl while kneading.
- Transfer this dough in oil greased big bowl.
- To proof the dough in instant pot –
- Proofing the bread dough in instant pot, especially in winter, is a game-changer. It reduces the time and gives the perfect result because of the constant heat temperature.
- Grease the inner pot of instant pot with oil or butter. Transfer the dough. Place the pot into the instant pot.
- Close the lid. Choose yogurt mode and set the timer to 45 minutes on normal.
- For regular method –
- Oil the bowl in which you kneaded the dough and then transfer the prepared dough into it. Cover it with a cling wrap or towel and allow it to proof for 1 hour and 30 minutes until it gets double in size in a warm place.
- Punch the dough once. Sprinkle some(about 1 tbsp) flour on your working surface. Knead the dough for a minute. Don't add too much flour otherwise, pav will not be soft.
- Measure the dough in the scale (If you have) and divide it into 20 equal parts about 50-54 grams. Or just eyeball and divide it into equal parts.
- Make round shape balls by tucking the sides to the base and rounding it out using your fingers and thumb. (Refer to a video given in recipe card).
- Take a 9×13 inch baking pan and grease it with oil and dust it with flour. (As shown in the video)
- Place all the balls into a baking pan with a little gap in between.
- Cover the baking pan with a kitchen napkin or cling wrap and keep aside for 1 hour for second proofing.
- After 1 hour, gently brush pav with milk.
- Preheat oven @ 400 degrees F (200 degrees C).
- Place the baking pan into the oven for 15 to 18 minutes. Keep an eye after 15 minutes.
- Take them out immediately and brush the top part with butter.
- Enjoy it with warm with smeared butter or let it cool down completely and enjoy it with bhaji, vada, misal or any meal.
Nutrition
Notes
- To make this recipe healthy, use whole wheat flour. The roll would be a little bit dense and not as light and fluffy. I recommend using half wheat and half white flour.
- If you don’t have a stand mixer, knead the dough with your hand for at least 15 minutes to develop enough gluten.
- All yeasts will work in this recipe. If you have Instant dry yeast, it can be added straight to dry ingredients and doesn't require any sitting or proofing. Active dry yeast needs to be dissolved in a liquid before adding to a recipe.
- The dough should be well hydrated, slightly sticky, but still very soft and pliable. When you lift the dough hook of the standing mixer, you should see the dough is still sticking to the base of the pot. In easy words, You should be able to feel a soft roll just by touching the dough.
- Always sift the flour before adding any ingredients. To measure is correctly, scoop the flour and level off the top.
I have never made this recipe with gluten-free flour. If you have tried with a good result, please share it with us in the comment box below. - The best way to make sure that your rolls are equal in size is to weigh them using a kitchen scale. Weigh the entire batch of dough using a kitchen scale and divide that weight by 20.
- To make this recipe vegan, use almond milk instead of regular milk, skip the milk powder and use more flour, and instead of butter use oil.
- I have used a 9×13 inch metal baking pan. If you are going to bake rolls in a glass pan, it might take a few minutes more to bake.
- Make sure the milk is at the right temperature. You're looking for somewhere between 100-110F. If it gets too hot, let it sit until it reaches the right temperature. Otherwise, hot milk will kill the yeast and the yeast won’t activate.
- Don’t forget to brush the rolls once it is baked to get the glossy effect. Plus this step makes the bread softer.
Why are my dinner rolls dense?
If your rolls are dense, the reason could be –- not kneading enough the dough mix or
- mixing the salt and yeast together.
What makes the bread soft and fluffy?
Milk powder and milk make this bread super soft and rich. I would recommend not to skip this. Post is updated with new image and content, originally published in Feb. 2015.Private Notes
Tried this recipe?
Let us know We would love to hear your thoughts! Please leave your comments, ratings, and any ideas or changes you think could help us make our recipes even better. Thank you for your feedback!Warm regards,
Dhwani


I made this Pav and they came out just awesome.
They are super soft and couldn’t stop eating this fresh and delicious Pav.
Perfect receipe and taste of India. Yummy!
Thanks Dhwani for the receipe.
Hi! Can I use a food processor to make the dough?
Thanks. Looks so yummy
Hi,
Yes, you can. Make sure you knead the dough really well.
is the milk powder necessary?and which kind you used?please let me know.
Thanks,
Lakshmi
Yes Lakshmi. It is necessary for this recipe. I have used instant dry milk powder. I hope this helps.
Thanks. 🙂
Can the 15 min kneading be done in a bread maker?
Hello,
I never Used bread maker before. If you have stand mixer(dough maker), you can use that to knead the dough.
Thanks.
Hi, tried this recipe today..pav turned out to be a super awesome…super spongy…I didn’t had milk powder so didn’t use it…but it tasted delicious 👍👍
Thanks for the feedback Kirti 🙂
Could you tell me where do I find the instant milk powder,even better if you could post a picture…thanks a ton
I found the instant milk powder in with the powdered coffee creamers section at the grocery store.
I made these buns and loved them! They were surprisingly easy and smell wonderful. Highly recommend.
Do they freeze well?
Yes, they do freeze well.
Can I use bread flour instead of all-purpose flour?
Yes, you can.
Hey Dhwani, tried your recipe, pav turned out super soft & fluffy. It was more rich in taste too. My best laadi pav ever.
So glad to hear this, Anushri! Thank you!
Which rack of oven do i place for baking
Middle-rack.
I have Instant dry yeast, should I still use 3tbsp? Thanks!
It’s 3 TSP, not TBSP. Yes, add 3 TSP instant yeast. Add directly into the flour, you don’t need to activate the yeast.
Hi, trying to make this recipe today… however I realised I don’t have a square baking Pan, can u suggest any alternative. Infact I don’t have any vessel/tool in square shape:( can I used a circle shape here instead?
Hi,
Of course you can use any shaped baking tray.
Hi,
How many grams as 1 cup, 1 tbsp& 1tsp?
As I have two sets of measurements and each bowl & spoon has different capacity.
Thank you.
Hi,
1 cup is around 200 gram
1 tbsp is about 15 gram
1 tsp is about 0.5 gram.
Thank you very much
Hi,
I have an OTG…. In which mode i.e. which rod should I keep on for baking on???
Please let me know asap
Hi Vineet. I have never baked in OTG before so I have no idea about it. So sorry!
Hi,
My ladi pav came out spongy and good looking. But they were chewy. I used instant yeast instead of active dry yeast and used a food processor dough maker option to make it as I don’t have a standing mixer. Could it be because of these that they turned out chewy?
Hi Jas!
Did you over ferment the dough? That could be the reason.
I used bread machine dough cycle it is turn out good. Once dough is ready then follow from step 4. Thanks Dhwani for recipe. It is turn out great
How did u make it brown and did u make in otg also can we use sordough starter
I am in the US and made it in a regular oven. Here there is nothing like OTG so I won’t be able to help. Yes, you can use a sourdough starter but the process will be little bit different.
A good easy to follow recipe. With a wonderful result!
Thank you!
Thank you for this recipe. I have missed Ladi pav so much living away and tried multiple times but your recipe in my first try itself was super success. Loved it so much.
So good to know. Thank you! 🙂
Can I make this with stuffing or filling inside it?
Hi. I have made your pav a couple of times. And it’s amazing. I was wondering if I can put stuff inside and bake. Like chicken or egg and stuff.
Hi. I have made your pav a couple of times. And it’s amazing. I was wondering if I can put stuff inside and bake. Like chicken or egg and stuff.
So good to know. Yes, you can stuff it with your choice of stuffing.
Super soft Pav but my base is not like you and indian Pav.. It’s flat n little hard but overall soft Pav. What wrong did I do? Is it my oven temperatures too high?
Thanks for trying this recipe.
Try to bake it 1 to 2 minutes less than the time mentioned in the recipe and see how it goes.
Thank you for the details Dhwani. If I have to store the proofed buns how to do? Or how soon shall I bake after 2nd proofing?
My pleasure. Store the dough in the refrigerator after first proofing the in the air-tight container. It stays good up to 4 to 5 days. Take it out from the fridge 2 hours before you are planning to bake them. Hope this helps.
Any idea what changes to make for those of us at high altitudes? I live at approximately 1,900 m and I haven’t gotten the hang of baking bread at such a high altitude. Thanks for any help you can give.
I dont think you need to change anything if you are using an Instant pot for proofing the dough.
Hi, at what speed do you knead the dough in a kitchen aid stand? 8-10 mins on speed 2 (which is recommended for yeast dough) or higher?
Thank you.
Hi, On Speed 2.
Made ladies pao just now. They came out perfect. I made the dough in bread machine though.thank you so much.
Sorry for typo. LADI PAO NOT LADIES PAO
So glad to know! 🙂
My laadi pao came out perfect. Thx for the recipe.
Glad to know. Thanks for the feedback. 🙂
I tried your recipe after my desi friend shared some homemade Bhaji with me, but we didn’t have Pav to eat it with. After I shared some freshly baked Pav with him, exclaimed, “Wow, this is a proper pav!” and got very happy after taking his first bite. Thank you for making the recipe easy to follow and delicious. Since living in Mumbai, I have been trying to recreate the flavors I fell in love with and this recipe will be made again and again!